Showing posts with label Alien Syndrome. Show all posts

Monday, August 26, 2019

Finished up Alien Syndrome

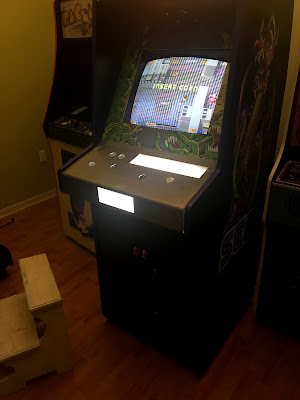
Alas the Alien Syndrome restoration comes to a close.  My daughter was recently visiting from college, so with her assistance, we were able to finish up the control panel overlay, as well as getting the controllers and buttons re-installed.


There are a few things I need to adjust as far as the controls and leaf switches are concerned, but for the most part this is a wrap.  I may attempt to track down the correct controllers, which to my knowledge were 8 way red textured joysticks manufactured by Coin Controls.  

I most enjoyed getting the chance to take the fight to the alien hoards in a couple of co-op rounds with my daughter.  While not really her thing, she could certainly appreciate the quirky game play mechanics, and the weird "over the top" alien morphology.

I'm very pleased with the artwork, and the laminate work turned out excellent.  Overall I'd say this was a success.  Huge thanks for the work of  KLOV member "AlienSyndrome", for not just one but two excellently documented Alien Syndrome restorations.  Also a big thanks to KLOV member SkyFighter for putting me in touch with Fiz whom provided the amazing reproduction artwork.  Big thank you to member HighProtein of theVillageBBS for responding with this project machine when I got the bug.  Lastly, but perhaps most important, notorious KLOV member Fizgig for the artwork, which made this project possible.

New Stuff on this machine:

Cabinet completely restored with laminate siding, new artwork, and repainted black surfaces.

New heavy duty power cord

New glass, and custom bezel artwork.

New purple t-molding

Replaced two front leg levelers

Original power supply completely cleaned, tested, and restored with Nichicon capacitors.

New fluorescent lights in the marquee fixture.

New LED light for the control panel displays

New CPO and 3d printed control panel light "windows"

New coin return buttons and lights

Replaced heavily "Tron" burned monitor with new-ish Happs Vision Pro display.

Cleaned and replaced wire harness, and replaced hacked molex connectors for monitor and fluorescent fixture.


Thursday, August 15, 2019

Control panel progress for Alien Syndrome

Just wanted to add a few pics here of what little progress I've made on the 3d printed control panel window replacements.


After a few versions, and modifications, I've managed to produce a workable solution. 
It's possible these won't fit correctly for other control panels, depending on how your printer is calibrated.  Also it's entirely possible the panels are all slightly different in size.

 In these pics the panels are being held in place only by the original nut and lock washers.  They seem to lay flat enough, but I may go back and add some VHB double-sided tape before finishing up with the control panel overlay.  I'd assume the CPO would help to hold the windows flat against the frame, and prevent flexing, but I'd rather be safe than sorry.  


The instructions panel was missing one of the captive studs, and the panel has a slight bend from the damage.  Rather than try to hammer the bend out, I decided on just filling the depression with filler putty.  I also filled the holes previously made when a clear plexi panel was screwed to the control panel.


Here you see I've added the monitor, which is the Happ's Vision Pro I ordered years ago when they were still available.  It's nice and clear, and the colors are still great.
So there it is for now, hopefully wrapping this up soon. 


Tuesday, August 6, 2019

Alien Syndrome Doldrums

Alas on to the boring stuff, or perhaps very boring, depending on your personal interests.

As much as I don't enjoy working with the coin doors, it's something that just has to be completed.  This one had been lightly coated with flat black spray paint.  I can't say I blame the previous owner for this, its a quick way to tidy things up.  Still the door had its share of scratches and dings, and you could see where over the years, many people tried and possibly succeeded in prying open the doors with a screwdriver.  The coin return buttons were wrong, they were from an Atari cabinet, and the 25 cent paper inserts had been soaked in soda at some point.  Leaving it like this just wouldn't be setting a good example for the young folks.


I started by removing the coin door and taking it completely apart.  The coin box was also pretty dirty and had some rust spots on the inside.  I saved the old coin door label and after cleaning up the coin box, glued it back into position under the test and service switches.  I soaked the yellowed plastic coin bucket in bleach water over night, and this brightened it up considerably.

For the individual coin doors, I used a small tack hammer to level out the bent edges and any dents on the front, then painted them with one coat of Rustoleum Hammered finish and then a coat of simi-gloss black.  Obviously the best course of action would be to have this sand blasted and powder coated, and I sometimes do that, but this time I decided to take the quick and dirty route.

I soaked the coin return and coin slot parts in soapy water over night and did my best to remove the remaining spray paint, then treated the plastic with Marine 303 vinyl protectant.  Digging through my stash of arcade parts, I found a new set of red coin return buttons that worked perfectly for this version.  I soaked the springs and other lightly rusted screws in vinegar for a few hours, and this removed the rust.

For the various parts of the coin return brackets, I decided just to clean them up, and reassemble.  I learned by asking the folks on KLOV, that this yellowish/gold finish is zink with yellow chromate.  Things of this era were plated with zinc and chromate, but several years previous to this, from what I learned, they were using cadmium which is relatively dangerous to handle.  You certainly wouldn't want to start sanding it or handling the parts without safety equipment.

Whenever I start cleaning up a cabinet for the first time, I save any unidentified parts I find laying in the bottom of the cabinet.  This turned out to be good practice, as the coin door was missing some parts, and I was able to locate them in the random bits I had previously saved.


None of the cam locks came with this cabinet, and the back door, as usually happens, was being held shut with drywall screws.  So for the coin door, I ordered a 4 pack of 7/8" cam locks with matching keys from Amazon.  On the inside of the top door, the original extra key hook was still in place, so I added a set of keys there for originality.


Using some Bondo spot putty, I patched and sanded up the holes and any deep scratches on the back door, then repainted with a water based black satin paint, using a foam roller.

Over the course of a few evenings, I rewired the inside of the cabinet. After running the wire harness through the dishwasher it was sparkly clean.  Using the pictures I took months ago, I was able to route the cables to their original locations, and used identical tiny white zip-ties to reattach everything.

With everything else done, I couldn't avoid the control panel any longer.  I knew this part was going to be tedious, and I had been dreading it.  It actually looks good in this picture, but the plexiglass panel in the instructions area is cracked and damaged, and there are various holes from the previously attached clear plastic cover.

I began by placing the panel in the sun to heat up, and then did my best to peel off the old overlay.  To my surprise, most of it came up relatively easy.  It was the colored bits that posed the most problem.  I used a narrow paint scraper and removed what I could.


This left me with a control panel and a thick coating of adhesive.  After trying various things, I settled on placing the whole panel in a plastic bin, and coating it with a product called CitriStrip.  After soaking in CitriStrip overnight, the adhesive was easy enough to scrape off.  I then had to scrub the panel down with Dawn dish washing detergent.  I cleaned up a few rust spots with sand paper and prepped it for applying the overlay.


Lastly, I approached the matter of replacing the plexiglass control panel windows.  These allow light to shine through, and illuminate the instructions and the Sega logo on the front.  It's a nice touch, but the thin plexi panels didn't fair so well over the years.  The largest one was cracked and badly damaged.  I set about trying to 3d print a replacement for it.


I modeled it up in Fusion 360 then printed it in a clear PETG filament.  Obviously it wasn't going to be clear, but I think it will work well enough.  After three attempts, adjusting the thickness and dimensions, I managed to get a perfectly fitting piece to replace the damaged panel.


So that's all for now.  I'll save applying the control panel overlay for a day when I'm totally rested and ready to take it on.


Monday, July 22, 2019

Alien Syndrome Side Art

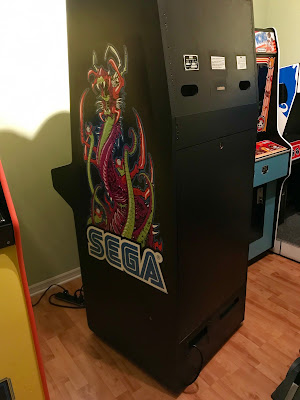
So fortunately I was able to track down some reproduction artwork.  Through a guy, who knew a guy, I had ordered new side art, a new control panel overlay, and a custom bezel.

The side art went on perfectly and without air bubbles or any other grief.  This can go badly if not done correctly.  I used the "wet" method by soaking the surfaces down with a spray bottle of water with just a tiny bit of mild soap.  This allows for a small amount of adjustment and with a squeegee I was able to work out any air bubbles with ease.  The artwork looks fantastic and you can see the colors really make this cabinet stand out.


After this I made a trip to Lowes, and purchased a new front glass and new 18" fluorescent tubes for the marquee.  

A quick check in the Alien Syndrome manual shows the original glass as 23 9/16" by 23 9/16".  They have thin window glass at the local Lowes, and they will cut it for free, which is a plus.

For the bezel, I didn't want to apply it to the glass.   I opted instead to purchase a 24" wide sheet of picture matting in white.  I then applied the artwork to the matting and using a new blade in an Exacto knife, I managed to cut the center square and sides out ( and my finger), leaving just the artwork, now on a nice card stock.  The bezel, while not original to the dedicated cabinet, really makes the game look sharp.


After this I cleaned up the metal box where the power cable attaches to the cabinet, by sanding it down and cleaning up any rust.  I then painted it with a gold metalic spray paint similar to it's original finish.  I replaced the power cable and rewired the 120V power lines going to the front control panel light, and the dual fluorescent light fixture in the top of the cabinet.  I checked the fuses and found that one was blown and neither matched the recommendations in the service manual.  Looking through my stash of 250v fuses, I found a 4 amp fuse for the lights, and a 5 amp delayed fuse for the main power input.

After replacing the power switch and replacing some of the old power cables, I decided to mount the marquee and test out the lights.


It's going to be a real beauty!


Wednesday, May 15, 2019

Alien Syndrome Cabinet Restoration

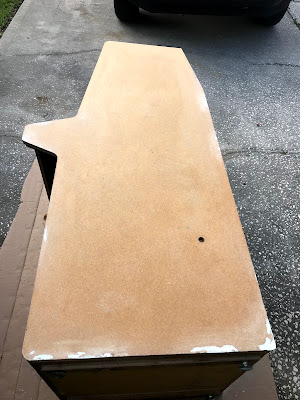
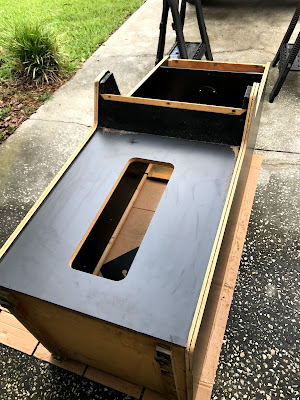
In an earlier post I mentioned this cabinet wasn't in the best shape.  Normally, if the damage isn't real bad, or the side art is just pealing up around the edges, I'll just have a go at cleaning up the cabinet and getting things looking acceptable.  For this game, since it has a unique look, and a really awesome design, I've decided to do a full restore of the side art, and laminate sections.

Having a quick look on KLOV, there were a couple of excellent documented restorations of this same cabinet.  Seeing how good they worked out, I took the same route.  I ordered up 3 sheets of WilsonArt vertical grade satin/matte laminate in black.  If you're careful you can get by with just two sheets, luckily I had three, because I had a few accidents.

To remove the artwork and vinyl coating I used a product called Quick-Strip.  It gets globbed on, since it's a gel, and really just eats away at whatever it touches.  So in about 20 minutes, the black covering started to bubble up and wrinkle.  Then I just used a scrapper and worked it up as best I could.   I should mention that I used painters tape around the edges to keep the Quick-Strip from dripping down over the sides.  Also, I wore a respirator, but I ran out of plastic gloves.  I would recommend using gloves, since afterwards, and for about 3 days, I didn't have much feeling in the ends of my fingers.  And this was with touching it very little, just enough to pull up small sections of the rubbery vinyl.


You can also see that some of the edges had the usual water damage, and bangs and bruises.  For those I mixed up several batches of Bondo, followed by careful sanding.  The lower back corners were almost completely gone, and those needed built up and shaped to look original.  This whole process took several days.


If you've never applied laminate, you're in for a treat.  While it absolutely blows away any finish you can usually achieve with paint, it's a pain in the butt to get right.

First thing is it comes in a 4x8 sheet, which is somewhat fragile, you can't bang it on anything, or bend it too much, or it will crack or snap.  You then need to cut a piece from the sheet, which is approximately the size of your surface, again being careful not to break or crack the laminate.

Perhaps there are better ways, but I used a contact cement.  This stuff gets painted on both the cabinet and the back of the laminate, then left to dry for about 25 minutes.  Once that's dry, you have to "carefully" bring the two surfaces together.  The moment they touch, it's game over, that stuff wont come loose, and there is no adjustment possible.  So I used a few wood dowels between the two surfaces, then pulled them out one at a time once the alignment was correct.  Oh, and almost forgot, if you have even a spec of dirt, a bit of saw dust, anything between the two surfaces, it will show as a bump when finished.  Ask me how I know.

Once the laminate is applied, I used a roller, designed for pressing down laminate, and rolled the whole thing over and over with a good deal of pressure, again being careful not to crack the edges.

Lastly the whole outer edge was cut using a tracing router bit.  That's the easy part.  Notice I don't have any pictures of the previously mentioned steps, that's likely due to the frustration I was going through.

One trick I learned, don't apply the contact cement with a paint brush, use a flat spatula type spreader, and just pour a small amount on the surface and quickly spread it around.  It's much easier, and you can get a much thinner layer down, much faster too.  Just don't let the lady of the house see you sneaking out with the spatula.


Once the laminate is all on and neatly trimmed, it's a thing of beauty and a joy forever.  Sorry about those pictures,  I was dodging rain showers most of the time just to get this done.

I also patched up those damaged areas on the inner panels above the control panel area.  One of them actually still had a large piece of screw still embedded in the surface.  To repair this damage took several days of sanding, and filling with Bondo putty, and more sanding.  Followed up with layers of high-fill primer, and more sanding until it was smooth, then several layers of satin black enamel paint.  Here are a few before and after pictures:


Now that the cabinet issues are sorted, it will receive a good cleaning inside and out, in preparation for the new reproduction artwork, which should be on it's way soon.


Thursday, May 2, 2019

Alien Syndrome nasty power supply refresh


For the most part, I've always restored arcade cabinets from the early 80's.  Later in that decade, it seems the industry began to move from linear power supplies, to the smaller, switch mode power supplies common today in almost everything.  I can't pretend to know why, likely for cost reasons.  These can be purchased now for about $20.  Many collectors just chuck out the old power supply and replace it with a cheap Peter Chou knock off.  Seems to make sense, but on the other hand, often the new product has been made in such a way as to extract every fraction of a cent profit conceivable.  As I said in an earlier post, the game works, and actually plays fine. Which is a testament to the design quality of the power supply. It's voltages were correct when tested with a multi-meter, but I could hear a loud hiss coming from the base of the cabinet, and I'm willing to bet the capacitors in there are dried up and bulging or leaking.
Since I now own an oscilloscope, and I'm just beginning to learn how to use it, I decided to take a look at the 5V output.  The display should be a nice flat line, what you don't want to see is AC ripple passing through.  I got this:


Yikes, not good.

Once I opened up the case, I could see most of the caps were bulging on the tops, and two were leaking.


So, after discharging those nasty capacitors, I decided to give it a bath, yes with soap and water:


I like that it has the year 1987 printed on the board, and Peter Chou.  Again, I'm no expert on switch mode power supplies, but this would have to be one of the earliest original Peter Chou models.  So I did a quick inventory of the caps, and jumped on Digi-key's website to place an order.

Meanwhile I cleaned up the enclosure, being careful not to scrub away the labels.  You can see it's a nice shiny blue, and it cleaned up really well:


I ordered the best quality Nichicon caps I could find, and had them by Wednesday evening:


A few months ago I was doing a lot of work on an old Vectorbeam monitor chassis, and I picked up a used panavise on ebay.  It makes working with these boards so easy:


To keep this post from getting really wordy I'll just say I swapped those caps out and got it looking spiffy. As David L. Jones would say, "Ah, she's a real bobby dazzler"!


Then I connected it to the oscilloscope again and as you can see, the signal is excellent, no AC ripple this time, and that annoying hiss is gone: