So for quite some time I've been trying to assemble at least one working Cinematronics game.
In September of 2019, I traded my restored Donkey Kong for two projects, an Atari Tempest, and a Cinematronics Star Castle.
The Tempest was in pretty good condition but needed some board work and some small amount of TLC, more on that later.
The Star Castle however, was awful. Which is likely the only reason it ever ended up in my hands in the first place. I say awful, but in reality, it's something of a blessing to have all of the parts actually together in one spot. Having been produced in 1980, most of these have long since retired to the local landfill.
Having repaired a couple of Vectorbeam monitors, (which are unique to Cinematronics games, and a huge pain in the ass) I felt confident I could restore the Star Castle regardless of condition.
This is one of those "After the Fact" posts. So rest easy, it won't be terribly detailed.
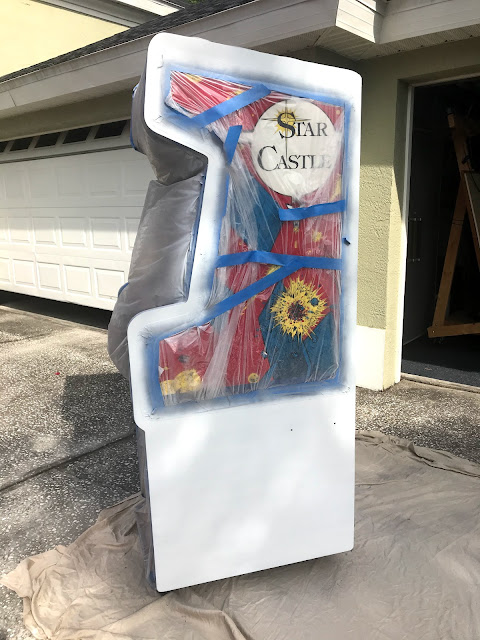
The cabinet was toast. Picture forty year old particle board, that's been rained on, stored in humid environments, and made home to all manner of vermin.
Normally I'll just hack away the bad wood, and replace the water damaged pieces. No worries.
If a cabinet is so far gone that it just needs to be burned, that makes the decision to construct a new cabinet an easy one. If, like this cabinet, the original side art is intact, or only parts of the cabinet are water damaged, it takes some hard choices. Do you go scorched earth, and start over, or try to save whats left? It's only original once.
These cabinets are unique in having a black textured vinyl on the inner surfaces. Reproduction vinyl is available, but expensive and difficult to match exactly. For this reason I debated on the restoration for a few months.
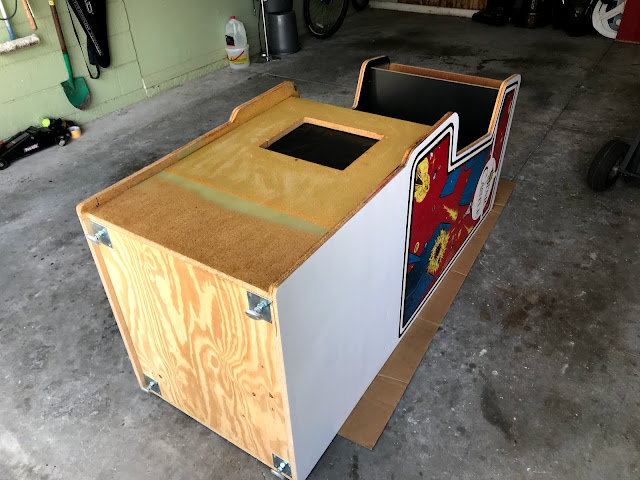
The bottom had fallen out of the cabinet due to water damage, and the whole thing was nearly impossible to move without parts falling off.
Then one day during the covid-19 pandemic I just decided to break out the circular saw, and hack away all the damaged wood. I followed the normal course of action and rebuilt the bottom with 3/4 inch plywood and the now missing sides with particle board and a biscuit joiner. The internal blocking was replaced with similar 1/2 inch pine and stapled in place like the originals.
Once this was done, and I had the cabinet up and standing again, it was easy to see the way forward.
Taking a chance I ordered about 6 feet of the textured vinyl from QuarterArcade.
After cleaning the side art really well, I decided to use a method from Frizzelfried of KLOV forum notoriety. He had suggested this once before when I restored an Atari Garvitar. By masking, then cutting along the edge of the artwork, and peeling away the outer vinyl, the surface can then be repaired, prepped, and painted to match the original vinyl surface.
This looks easy but to achieve a good finish actually takes a great deal of effort. The surface has to be primed well, and many, many days of sanding and filling will follow.
The front panel needed to be one seamless piece of vinyl. I stripped the remaining vinyl from the front of the cabinet then filled the lock bar holes and any other damage with bondo. Sanded down and filled the transitions between new wood and old, then applied the new vinyl.
Below is a shot of the front edges near the control panel. Here, and in other places, the vinyl covering is cracked and peeling. It generally looks shabby. I decided to attempt a surgical removal of the old, keeping the edges as cleanly cut as possible, then patching in new vinyl. Keeping the edges below the control panel would help hide the repair once the cabinet was fully assembled.
The patching was a success, and the new vinyl was the exact same texture as the old. Hats off to Quarter Arcade for providing this excellent material.
During all of this, I was addressing the issues with the control panel and bezel artwork. At some point in the past, someone had used black spray paint to touch up the cabinet. It's hard to see in the photos, but both the control panel and the marquee had major black over spray around all the edges. To resolve this I used Bar Keepers Friend and lots of elbow grease. This had the added benefit of cleaning up a good percentage of the cigarette burns as well.
The metal parts got sand blasted and powder coated. The dingy old buttons were replaced with new reproductions.
The coin door and it's decal, fortunately were in good shape and only needed a light spray to touch up.
The most daunting was probably the colored gel graphic which overlays the monitor. This had years of duct tape grime and took slow careful work with Simple Green to remove without damaging the thin colored layer.
Sadly, it was around this time I learned the man credited with designing Star Castle, Tim Skelly, had passed away. Tony Temple over at The Arcade Blogger, wrote an excellent article on Tim, and it's worth reading.
Have a look at the final product, it certainly turned out better than I could've expected.


No comments:
Post a Comment