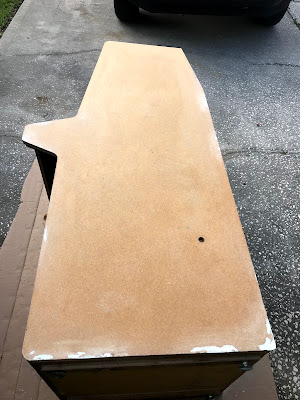
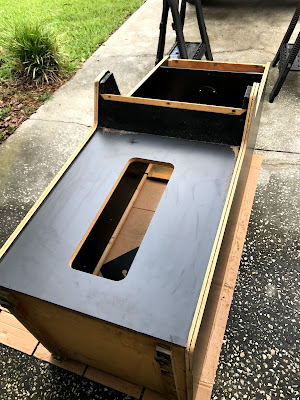
In an earlier post I mentioned this cabinet wasn't in the best shape. Normally, if the damage isn't real bad, or the side art is just pealing up around the edges, I'll just have a go at cleaning up the cabinet and getting things looking acceptable. For this game, since it has a unique look, and a really awesome design, I've decided to do a full restore of the side art, and laminate sections.
Having a quick look on KLOV, there were a couple of excellent documented restorations of this same cabinet. Seeing how good they worked out, I took the same route. I ordered up 3 sheets of WilsonArt vertical grade satin/matte laminate in black. If you're careful you can get by with just two sheets, luckily I had three, because I had a few accidents.
To remove the artwork and vinyl coating I used a product called Quick-Strip. It gets globbed on, since it's a gel, and really just eats away at whatever it touches. So in about 20 minutes, the black covering started to bubble up and wrinkle. Then I just used a scrapper and worked it up as best I could. I should mention that I used painters tape around the edges to keep the Quick-Strip from dripping down over the sides. Also, I wore a respirator, but I ran out of plastic gloves. I would recommend using gloves, since afterwards, and for about 3 days, I didn't have much feeling in the ends of my fingers. And this was with touching it very little, just enough to pull up small sections of the rubbery vinyl.
You can also see that some of the edges had the usual water damage, and bangs and bruises. For those I mixed up several batches of Bondo, followed by careful sanding. The lower back corners were almost completely gone, and those needed built up and shaped to look original. This whole process took several days.
If you've never applied laminate, you're in for a treat. While it absolutely blows away any finish you can usually achieve with paint, it's a pain in the butt to get right.
First thing is it comes in a 4x8 sheet, which is somewhat fragile, you can't bang it on anything, or bend it too much, or it will crack or snap. You then need to cut a piece from the sheet, which is approximately the size of your surface, again being careful not to break or crack the laminate.
Perhaps there are better ways, but I used a contact cement. This stuff gets painted on both the cabinet and the back of the laminate, then left to dry for about 25 minutes. Once that's dry, you have to "carefully" bring the two surfaces together. The moment they touch, it's game over, that stuff wont come loose, and there is no adjustment possible. So I used a few wood dowels between the two surfaces, then pulled them out one at a time once the alignment was correct. Oh, and almost forgot, if you have even a spec of dirt, a bit of saw dust, anything between the two surfaces, it will show as a bump when finished. Ask me how I know.
Once the laminate is applied, I used a roller, designed for pressing down laminate, and rolled the whole thing over and over with a good deal of pressure, again being careful not to crack the edges.
Lastly the whole outer edge was cut using a tracing router bit. That's the easy part. Notice I don't have any pictures of the previously mentioned steps, that's likely due to the frustration I was going through.
One trick I learned, don't apply the contact cement with a paint brush, use a flat spatula type spreader, and just pour a small amount on the surface and quickly spread it around. It's much easier, and you can get a much thinner layer down, much faster too. Just don't let the lady of the house see you sneaking out with the spatula.
Once the laminate is all on and neatly trimmed, it's a thing of beauty and a joy forever. Sorry about those pictures, I was dodging rain showers most of the time just to get this done.
I also patched up those damaged areas on the inner panels above the control panel area. One of them actually still had a large piece of screw still embedded in the surface. To repair this damage took several days of sanding, and filling with Bondo putty, and more sanding. Followed up with layers of high-fill primer, and more sanding until it was smooth, then several layers of satin black enamel paint. Here are a few before and after pictures:
Now that the cabinet issues are sorted, it will receive a good cleaning inside and out, in preparation for the new reproduction artwork, which should be on it's way soon.
Wednesday, May 15, 2019
Alien Syndrome Cabinet Restoration
Labels:
Alien Syndrome
Thursday, May 9, 2019
Labels:
Astromech
Disney reached out to our builders group, asking for 10 droids to attend their May 4th event at Hollywood Studios. That's an offer no Star Wars fan can turn down.
After sending in a couple of pictures, R2-J8 was accepted for the event. Lately this old droid has been needing some repairs, and I've just been letting it go. So I decided I needed to fix some things, and if possible, use the event as an excuse to do some upgrades if time permitted.
Over the course of doing various events, I began to notice several panels not opening correctly on the dome, or not opening at all. After doing a little testing, I came to the realization that I needed to replace 5 of the panel servos, and 2 of his holoprojector actuators. I placed an order for 5 new servos on Amazon, and they arrived really fast. So those were replaced without much grief, and J8 was back to his full 10 panel dome animations.
A few months ago I purchased an aluminum holo projector from the a guy on the Astromech forum. Let me tell you, that thing looks sweet, really makes my 3D printed plastic holo projectors look shabby. So I decided that would be a good upgrade to do, and that it would be a simple swap out of the old ones. Also, if I'm going to do an upgrade, I want it to be something that everyone is focused on, and those projectors are front and center. I had been having problems with the plastic 3D printed ones seizing up in the sockets, and I believe that has led to some of the actuating servos getting fried.
So once the holo projectors arrived, I got to work with the "quick swap out", which turned out to be anything but quick. First thing, I had applied a loctite to the threads to keep them from working loose, so each and every little bolt was a chore to remove. Then I found that the openings in the dome where smaller than the cowl for the new aluminum pieces. This led to a few hours of sanding with the ol'sandpaper wrapped around a wine bottle technique. In the end, I managed to replace the front facing projector and the rear projector. The third top one I left alone, as I was running out of time.
With one day left before the event, I decided it was time to organize the womp rat's nest of wires I had created in J8's dome. So using some woven cable tubing, I managed to get everything somewhat organized and looking much better.
So I met with most of the guys in the group over at Disney Springs for an early dinner. I think the place was called Blaze Pizza. The pizza was amazing, the weather was not.
We had two bouts of rain come through, one just before 8:00 PM and another shortly after arriving. Fortunately I was able to get J8 assembled and into the building between showers.
The remainder of the night was excellent. There were lots of great Star Wars fans, some even in costume. R2-J8 had tons of pictures taken, with groups and dozens of selfies. I had a great time as always, just driving around and working with the crowds.
We finished up around 12:30, and took a few group photos outside the Star Wars Launch Bay.
Thursday, May 2, 2019
Alien Syndrome nasty power supply refresh
Labels:
Alien Syndrome
For the most part, I've always restored arcade cabinets from the early 80's. Later in that decade, it seems the industry began to move from linear power supplies, to the smaller, switch mode power supplies common today in almost everything. I can't pretend to know why, likely for cost reasons. These can be purchased now for about $20. Many collectors just chuck out the old power supply and replace it with a cheap Peter Chou knock off. Seems to make sense, but on the other hand, often the new product has been made in such a way as to extract every fraction of a cent profit conceivable. As I said in an earlier post, the game works, and actually plays fine. Which is a testament to the design quality of the power supply. It's voltages were correct when tested with a multi-meter, but I could hear a loud hiss coming from the base of the cabinet, and I'm willing to bet the capacitors in there are dried up and bulging or leaking.
Since I now own an oscilloscope, and I'm just beginning to learn how to use it, I decided to take a look at the 5V output. The display should be a nice flat line, what you don't want to see is AC ripple passing through. I got this:
Yikes, not good.
Once I opened up the case, I could see most of the caps were bulging on the tops, and two were leaking.
So, after discharging those nasty capacitors, I decided to give it a bath, yes with soap and water:
I like that it has the year 1987 printed on the board, and Peter Chou. Again, I'm no expert on switch mode power supplies, but this would have to be one of the earliest original Peter Chou models. So I did a quick inventory of the caps, and jumped on Digi-key's website to place an order.
Meanwhile I cleaned up the enclosure, being careful not to scrub away the labels. You can see it's a nice shiny blue, and it cleaned up really well:
I ordered the best quality Nichicon caps I could find, and had them by Wednesday evening:
A few months ago I was doing a lot of work on an old Vectorbeam monitor chassis, and I picked up a used panavise on ebay. It makes working with these boards so easy:
To keep this post from getting really wordy I'll just say I swapped those caps out and got it looking spiffy. As David L. Jones would say, "Ah, she's a real bobby dazzler"!
Then I connected it to the oscilloscope again and as you can see, the signal is excellent, no AC ripple this time, and that annoying hiss is gone:
Subscribe to:
Comments (Atom)


