So after modding my old Game Gear, I started thinking about smd ceramic capacitors.
Everyone talks about the bad capacitors Sega used in the Game Gear, which just seems odd to me. Seeing how it goes without saying, old equipment, will likely have leaky or dried out capacitors. This got me thinking about using ceramic capacitors, both for their longevity, and reduced size.
After studying the offerings at
Digi-Key for what seemed like hours, I pieced together what I hoped would be suitable replacements for the electrolytic values. Wherever possible, I kept to the larger smd sizes of 1210, 1206, and I think some were 0805. These would still be large enough to span the solder pads on the board, and although very tiny by most standards, easy enough to solder with my limited equipment.
Since there's a significant price break for ordering 10 or more pieces, I decided to just get enough to do 10 boards total. I got on ebay and ordered a few "for parts only" or "broken" Game Gears. They arrived about the same time the capacitors did, and I got to work cleaning off the old smelly caps, and getting the board nice and clean. The new caps soldered in place with ease, I mean much, much easier than the previous through hole caps, which saved a lot of time and frustration. I was enjoying the process so much I ordered a couple more, and before I knew it I had around 6 or 7 working systems. For kicks I even purchased a few of the rarer colors. Shipped from Japan as non-working, "Junk" was the word they used in the description.

In the above pic, you can see there are just three connectors between the top and bottom half once the screws are removed from the outside case. To the top left is a small power board which takes the 9V from the batteries and feeds out 5v, and 34v to the main board. The power board has just three through hole caps. Sometimes the AC adapter jack is bad or shorted, which keeps the system from powering on.
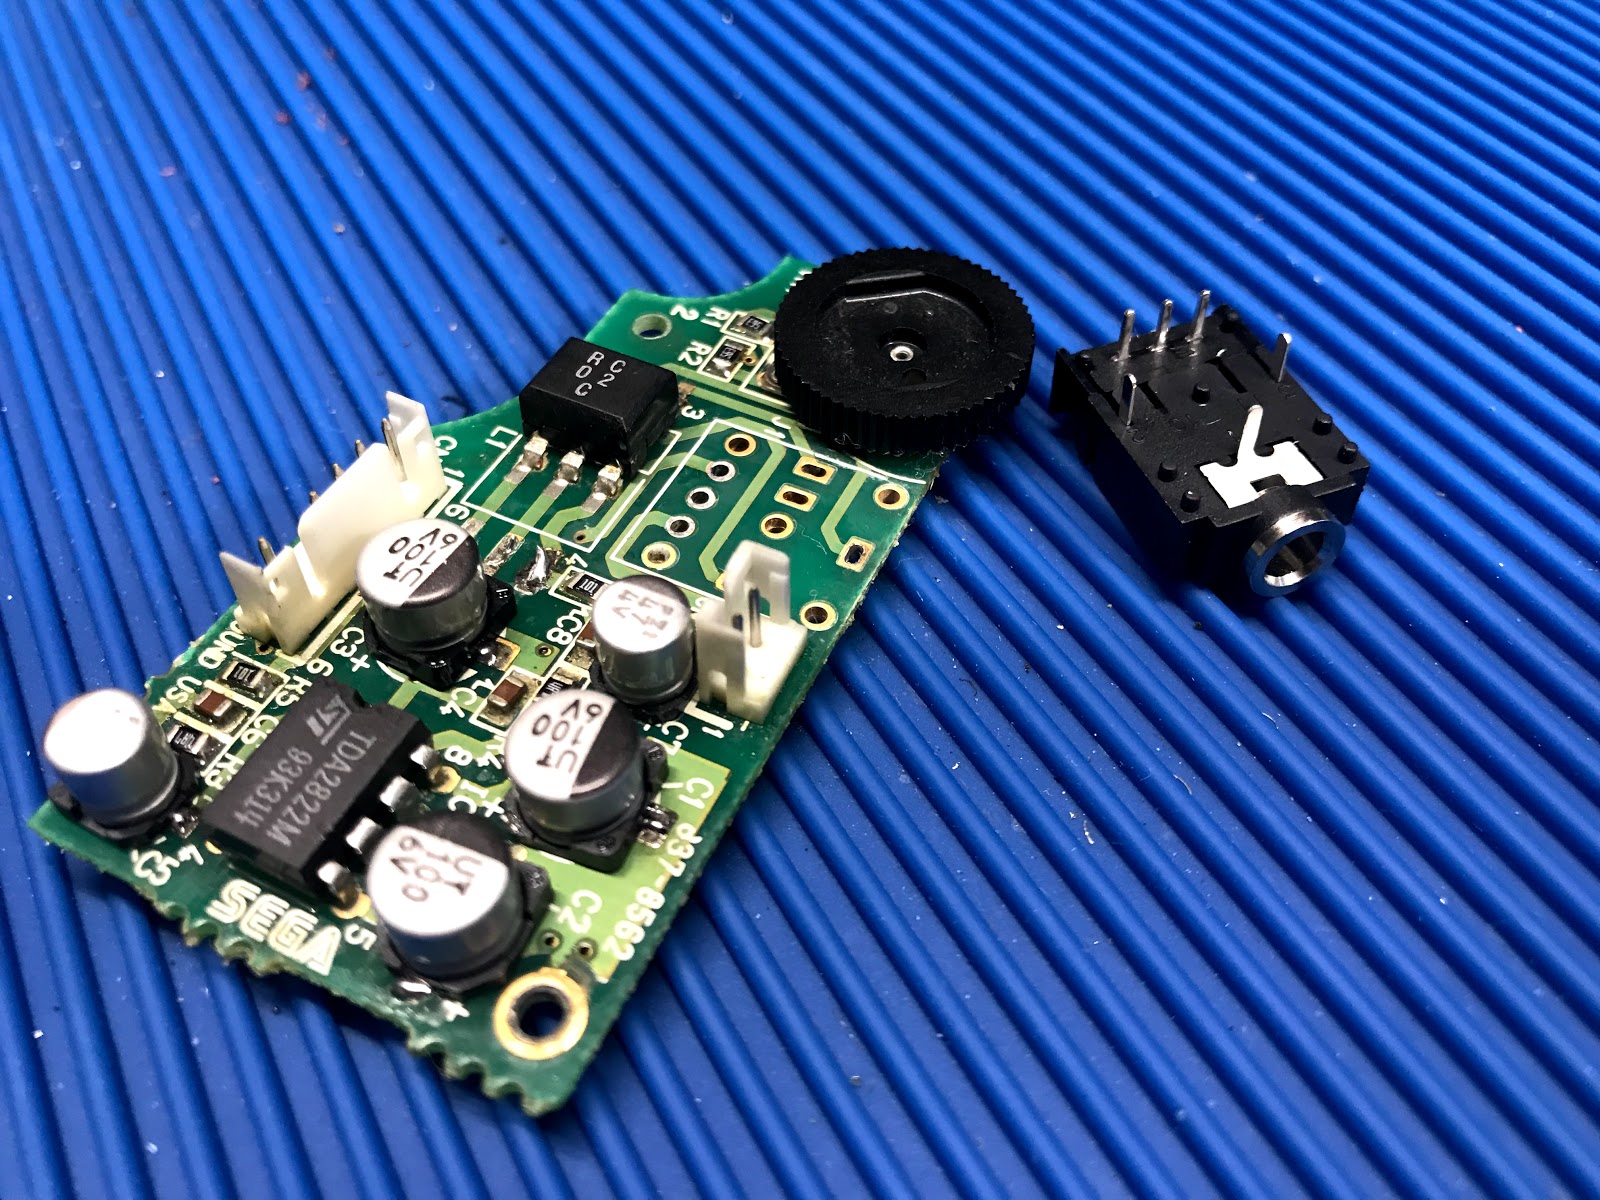
To the top right is the sound board, these have surface mount electrolytic caps, I chose to replace them with similar Nichicon surface mount electrolytic caps. I suspect they are a better choice for audio circuits. On one board, I still couldn't get sound after replacing the caps, and it turned out to be a bad earphone jack.
To the top left of the main board is a 20k thumbwheel potentiometer used to adjust the screen brightness. As of now, I haven't been able to source these from anywhere online, perhaps a surplus store somewhere has them? I accidentally melted one of these by getting too close with the soldering iron.
The CPU, for those interested, was a custom Z80A, running at the screaming fast speed of 3.58MHz!
In the very center of the board is the screen backlight, which seemed to be the achilles heel of the system. I suppose at the time these were made, white LEDs either hadn't been invented, or were too expensive. So they used a tiny fluorescent tube, along with the tiny little transformer, and the system chewed through 6 AA batteries in just a few hours of game play.
My small hoard of refurbished systems
Check out the
Game Gear TechWiki at Console 5 for easy to read diagrams and component lists.
They also have a nice downloadable
Game Gear Service Manual, which could come in handy.
My parts list from Digikey (
use at your own risk, this is only experimental ) :
| Manufacturer | Digi-Key Part Number | VA1 Twin ASIC | VA1 Single ASIC | Unit Price | Description |
| TDK Corporation | 445-13044-1-ND | C1 | C1 | 0.759 | CAP CER 33UF 6.3V X7S 1210 |
| TDK Corporation | 445-8036-1-ND | C49 | C43 | 0.564 | CAP CER 22UF 6.3V X7S 1206 |
| TDK Corporation | 445-11744-1-ND | C35 | C45 | 0.584 | CAP CER 4.7UF 35V JB 1206 |
| TDK Corporation | 445-14671-1-ND | C37 | C47 | 0.807 | CAP CER 68UF 6.3V X5R 1206 |
| TDK Corporation | 445-6017-1-ND | C39 | C49 | 1.139 | CAP CER 100UF 4V X6S 1210 |
| TDK Corporation | 445-14852-1-ND | C44,C45 | C54,C55 | 0.345 | CAP CER 0.47UF 50V X8R 1206 |
| TDK Corporation | 445-1437-1-ND | C31 | C68 | 0.763 | CAP CER 100UF 6.3V X5R 1210 |
| TDK Corporation | 445-7644-1-ND | C3,C6,C48 | C4,C11,C14,C42 | 0.159 | CAP CER 10UF 16V X5R 0805 |
| Nichicon | 493-2088-1-ND | | C1,C2,C3 Sound | 0.217 | CAP ALUM 100UF 20% 6.3V SMD |
| Nichicon | 493-9593-1-ND | | C5,C7 Sound | 0.214 | CAP ALUM 47UF 20% 4V SMD |
| Nichicon | 493-10444-1-ND | | C5 Power | 0.219 | CAP ALUM 22UF 20% 35V RADIAL |
| Nichicon | 493-17696-1-ND | | C11 Power | 0.299 | CAP ALUM 100UF 20% 25V RADIAL |
| Nichicon | 493-11812-1-ND | | C13 Power | 0.402 | CAP ALUM 820UF 20% 6.3V RADIAL |
While most of the cheap consoles I purchased only needed the capacitors replaced, and a little cleaning, a few were in awful condition, some perhaps beyond saving. One had screen damage, so I may just order up another McWill LCD kit for it, and hope for the best.
One curious thing of note, during the few years these were being produced, mostly between 1991 and 1994, there were many versions, and revisions. Also they were manufactured in Taiwan, China, and Japan, with all of them having their own quirks. I made every effort to jot down notes on each one, and managed to keep the sound boards and power boards together with their original main board.
The humble Sega Game Gear, just gets no love these days.