Monday, December 9, 2019

Sega Turbo returns

If you attended Free Play Florida 2019, you probably saw, and hopefully played the Sega Turbo.  Well I owned a Turbo, way back in 2012, and I very much loved the game.  Much like Gravitar, it's one of those I regretted letting go instantly.  So when I had the chance to buy this one, in great shape, at a good price, I couldn't pass it up.


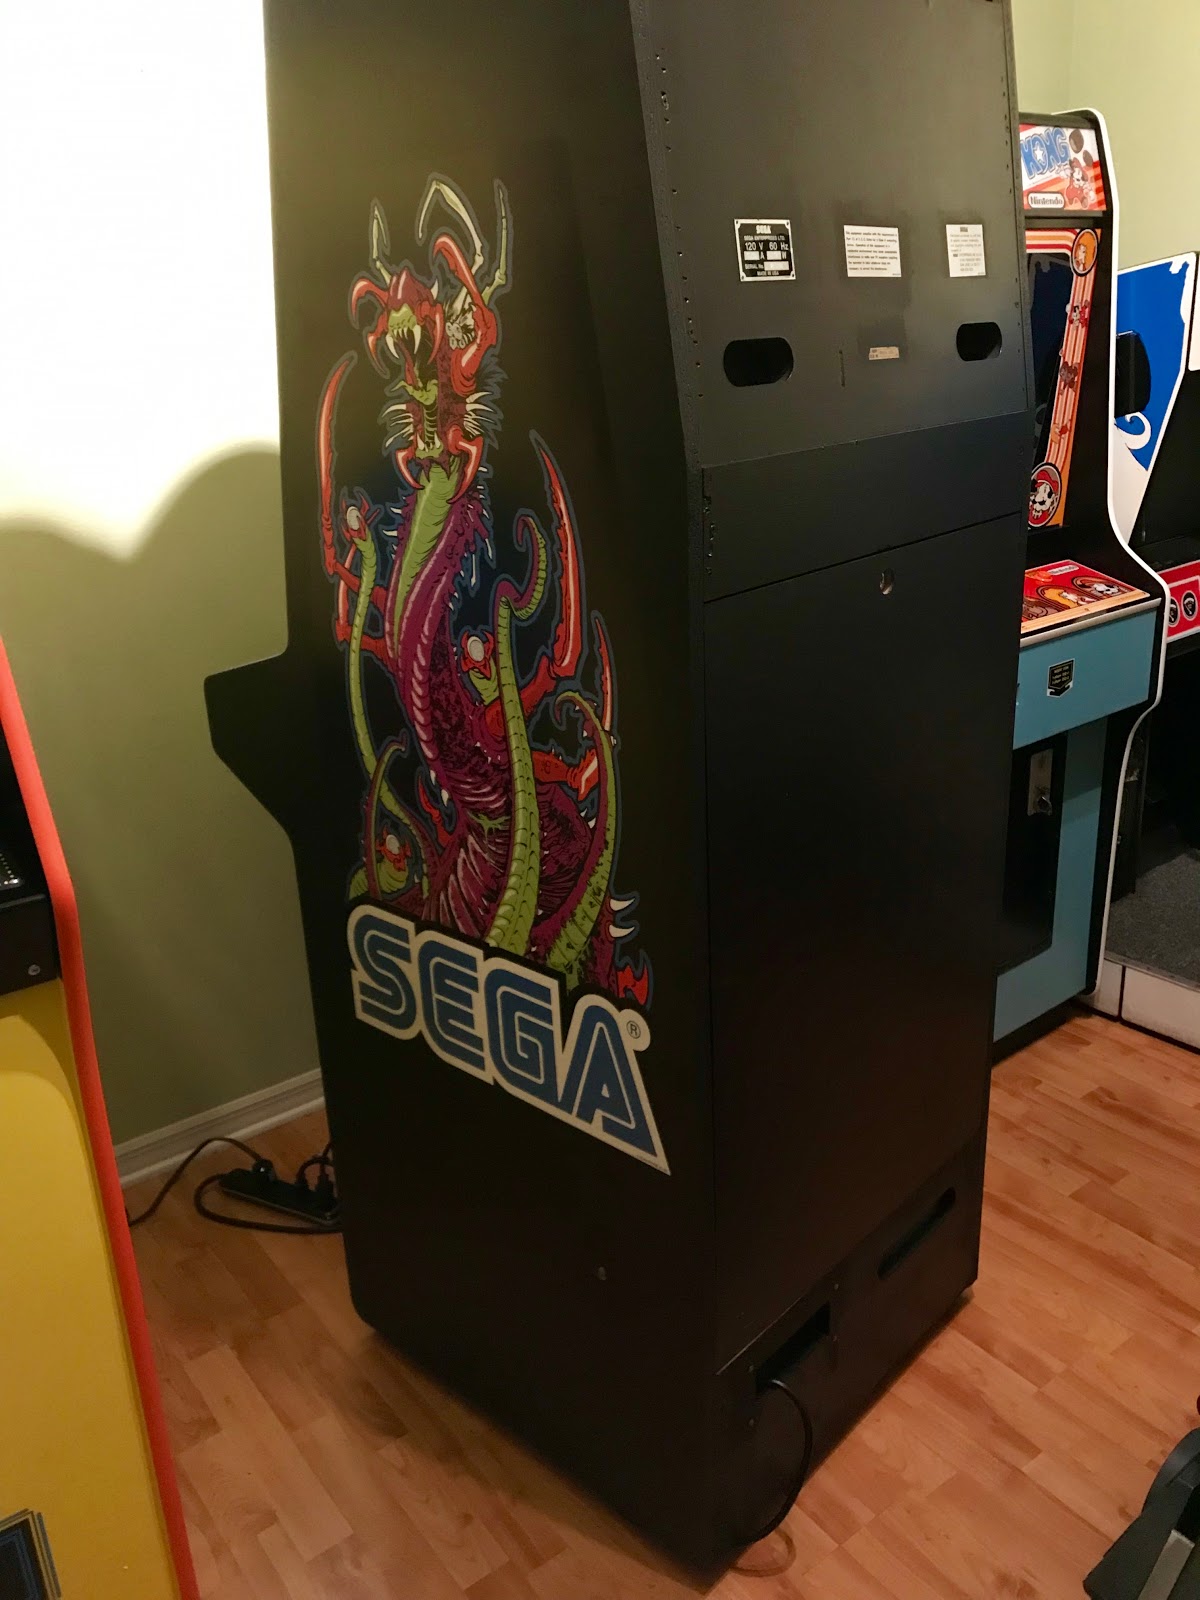
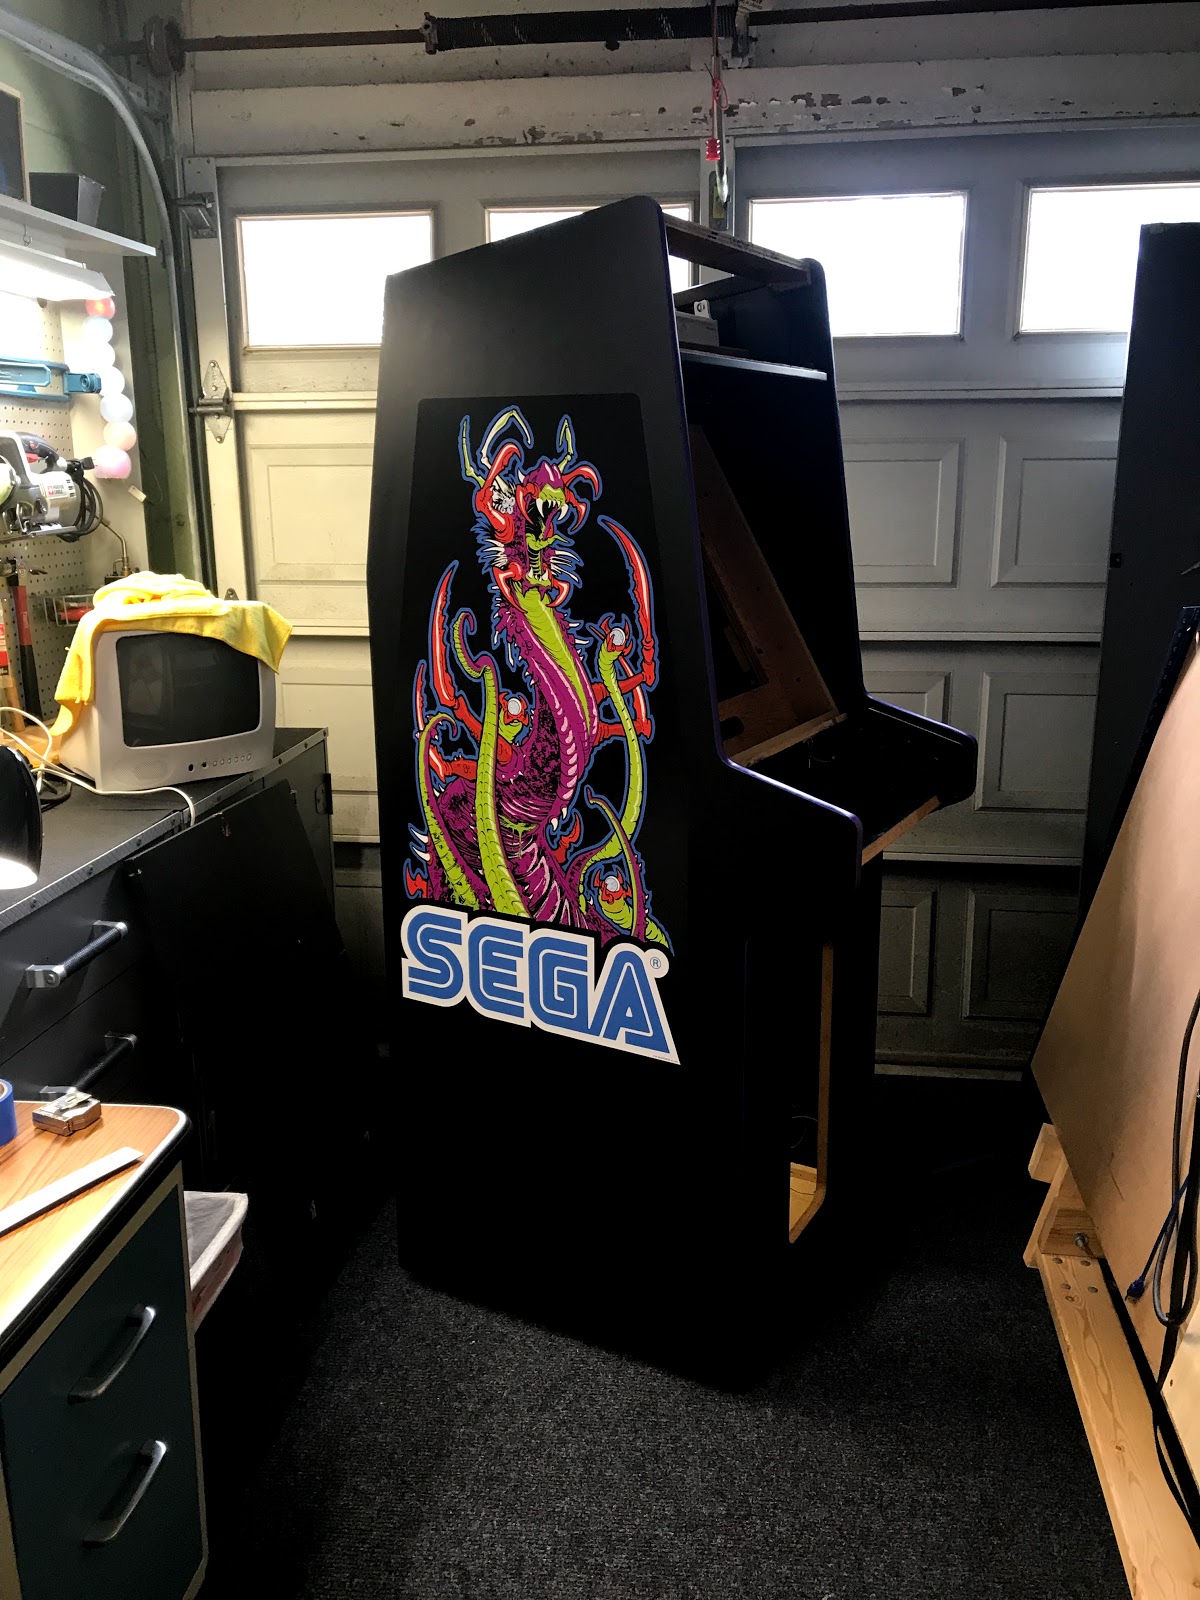
As I mentioned, the cabinet is in good condition.  The side art is nearly perfect.  The control panel is practically free of the usual cigarette burns, and the shift knob is intact.  When Sega built this cabinet, it seems they spared no expense.  There are dozens of extra little details added that really add to the experience, and make it a great piece for collectors.

The design of the cabinet is brilliant.  Rather than the usual marquee, they opted to extend the cabinet upwards and out over the player.  This serves to create a more immersive effect, sort of a sudo-cockpit feel.  Then they added an LED score board, apart from the monitor, which displays the current top five scores.   The control panel is shaped like a dashboard, and they even added a couple of lighted gauges.   Perhaps my favorite addition, a 12" woofer adds the deep engine rumble and echo effect when passing through tunnels.

My plans are to clean up the cabinet, leaving it as original as possible.

For starters, the inside will require a serious cleaning.  Due to the strong cooling fan, and bottom vent, this game always pulls in mounds of dust.  I'll likely begin by vacuuming and brushing up what I can reach.  Then remove the monitor for a good washing down, followed by the removal of the wiring harness and all remaining bits.


The 12" woofer, I previously mentioned, has fallen apart with age.  The foam surround has gone the way any old foam from 1980 would, it's now part of the dust and garbage in the bottom of the cabinet.

On my last Turbo, the speaker was also damaged in this way, and I replaced it with a new speaker.  I was never really happy with that choice.  Odd as it may seem, the new speaker just sounded too good.  Maybe sounding too good isn't the right choice of words, It sounded like a new speaker, or new technology.  What I remember thinking was, "It didn't sound original".

This time I plan to repair the speaker with a foam surround replacement kit.  I think this is a good choice, as it will maintain the original look, and with any luck, sound more like the arcade noise of yore.

This cabinet actually has a back door, but upon close inspection, it doesn't seem to be the correct back door.  So, again, I'll be making a replacement door, and fitting a lock.

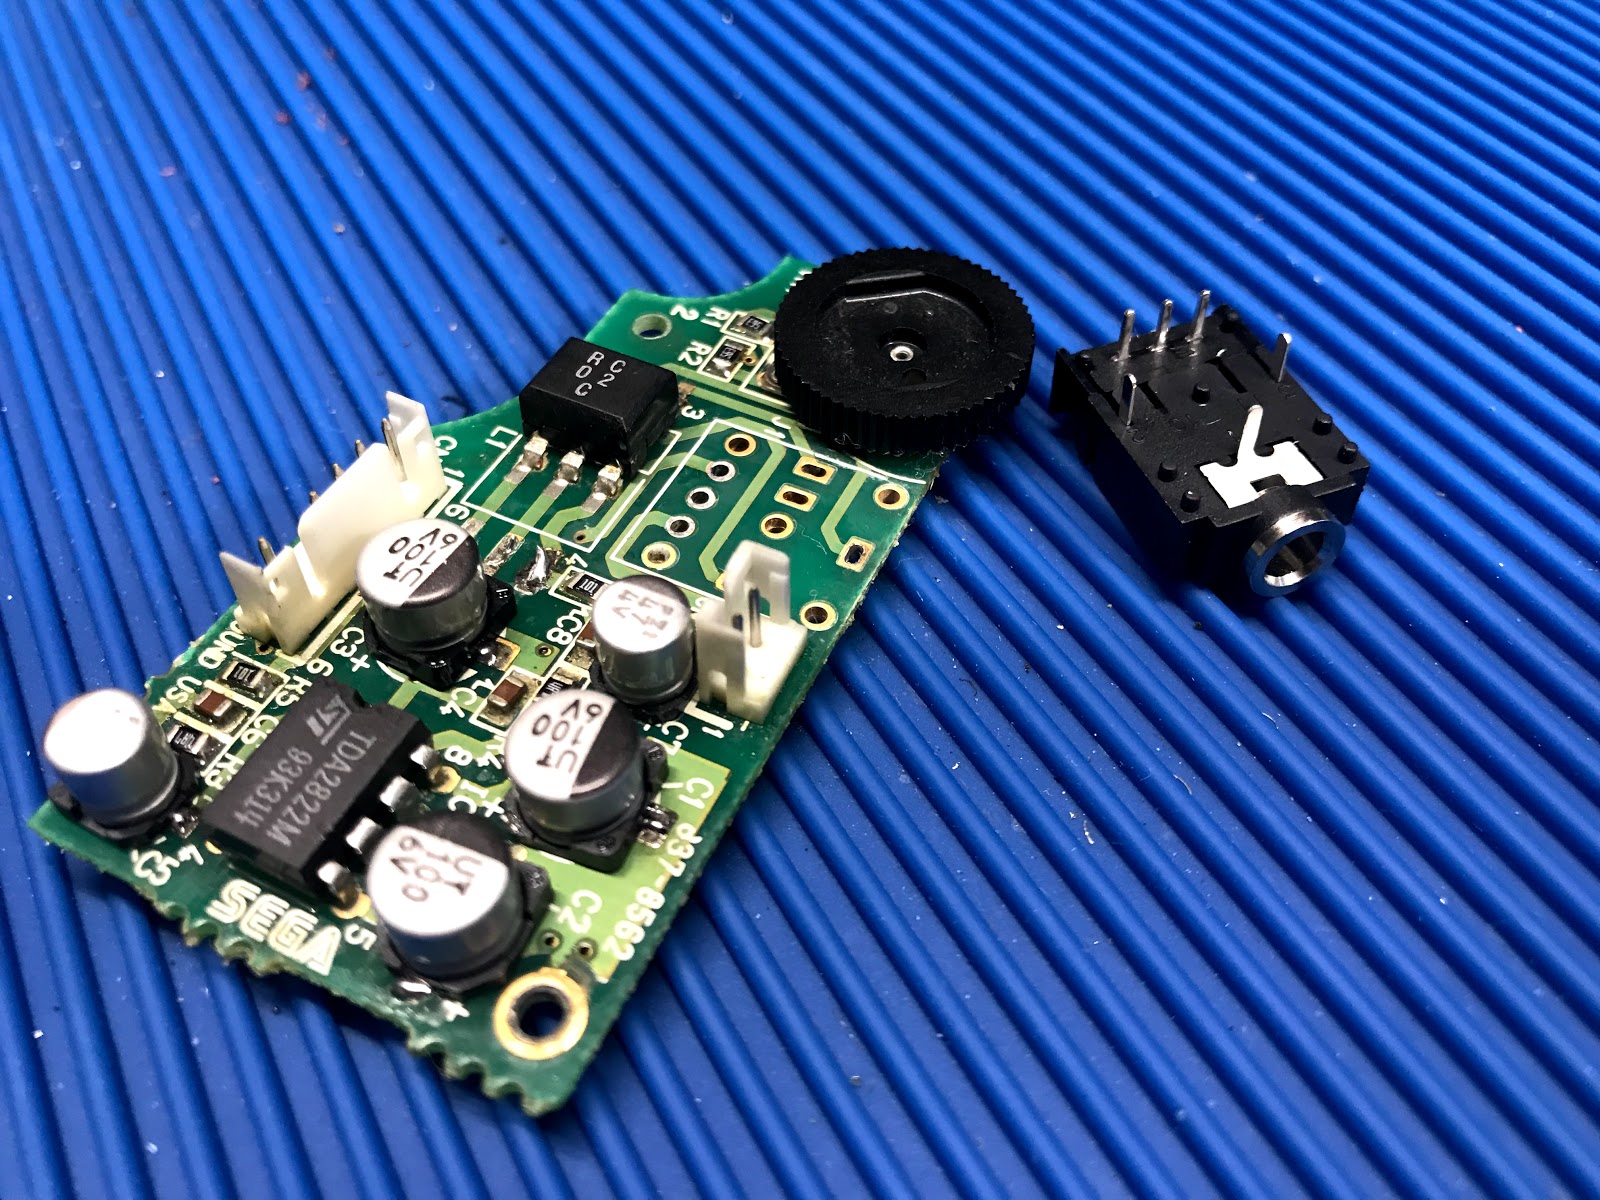
I'll likely replace the power cord, since it's missing the ground pin.  Then I'll go through the power supply and amplifier and replace the old capacitors.


The display looks good, and has good color, so I'm on the fence about overhauling the monitor chassis, but it will likely get done when I pull it out for cleaning.

Cosmetically, the cabinet is an A+, but the insides are very dirty, and it has a couple of glitches which I can hopefully iron out.


Tuesday, September 17, 2019

Goodbye Donkey Kong!


I'm pretty terrible at Donkey Kong.  I like the game, really, but I don't find myself playing it much.  In fact I don't often play many of my games for more than a few minutes at a time.  Really I'm usually more interested in how they work, and getting them working and looking right again.  This was my second time restoring and owning a Donkey Kong, and it was something I restored in the hopes of trading off for something better some day.

So last Sunday was that day.  I'd been wanting a Tempest again, or any old vector for that matter.   I posted some pics of the DK on the local forum, asking for a project vector or two, and it wasn't long before I got a few offers.  I won't go into the details, but I gladly hauled the DK over to a collector in Orlando, and came home with a "mostly" working Tempest, and a "on life support" Star Castle.  Both projects, and hopefully I'll have a working Tempest soon.  As for the Star Castle, I'll just have to be patient.


So long DK, been good to know  ya.


Monday, August 26, 2019

Finished up Alien Syndrome

Alas the Alien Syndrome restoration comes to a close.  My daughter was recently visiting from college, so with her assistance, we were able to finish up the control panel overlay, as well as getting the controllers and buttons re-installed.


There are a few things I need to adjust as far as the controls and leaf switches are concerned, but for the most part this is a wrap.  I may attempt to track down the correct controllers, which to my knowledge were 8 way red textured joysticks manufactured by Coin Controls.  

I most enjoyed getting the chance to take the fight to the alien hoards in a couple of co-op rounds with my daughter.  While not really her thing, she could certainly appreciate the quirky game play mechanics, and the weird "over the top" alien morphology.

I'm very pleased with the artwork, and the laminate work turned out excellent.  Overall I'd say this was a success.  Huge thanks for the work of  KLOV member "AlienSyndrome", for not just one but two excellently documented Alien Syndrome restorations.  Also a big thanks to KLOV member SkyFighter for putting me in touch with Fiz whom provided the amazing reproduction artwork.  Big thank you to member HighProtein of theVillageBBS for responding with this project machine when I got the bug.  Lastly, but perhaps most important, notorious KLOV member Fizgig for the artwork, which made this project possible.

New Stuff on this machine:

Cabinet completely restored with laminate siding, new artwork, and repainted black surfaces.

New heavy duty power cord

New glass, and custom bezel artwork.

New purple t-molding

Replaced two front leg levelers

Original power supply completely cleaned, tested, and restored with Nichicon capacitors.

New fluorescent lights in the marquee fixture.

New LED light for the control panel displays

New CPO and 3d printed control panel light "windows"

New coin return buttons and lights

Replaced heavily "Tron" burned monitor with new-ish Happs Vision Pro display.

Cleaned and replaced wire harness, and replaced hacked molex connectors for monitor and fluorescent fixture.


Thursday, August 15, 2019

Control panel progress for Alien Syndrome

Just wanted to add a few pics here of what little progress I've made on the 3d printed control panel window replacements.


After a few versions, and modifications, I've managed to produce a workable solution. 
It's possible these won't fit correctly for other control panels, depending on how your printer is calibrated.  Also it's entirely possible the panels are all slightly different in size.

 In these pics the panels are being held in place only by the original nut and lock washers.  They seem to lay flat enough, but I may go back and add some VHB double-sided tape before finishing up with the control panel overlay.  I'd assume the CPO would help to hold the windows flat against the frame, and prevent flexing, but I'd rather be safe than sorry.  


The instructions panel was missing one of the captive studs, and the panel has a slight bend from the damage.  Rather than try to hammer the bend out, I decided on just filling the depression with filler putty.  I also filled the holes previously made when a clear plexi panel was screwed to the control panel.


Here you see I've added the monitor, which is the Happ's Vision Pro I ordered years ago when they were still available.  It's nice and clear, and the colors are still great.
So there it is for now, hopefully wrapping this up soon. 


Tuesday, August 6, 2019

Alien Syndrome Doldrums

Alas on to the boring stuff, or perhaps very boring, depending on your personal interests.

As much as I don't enjoy working with the coin doors, it's something that just has to be completed.  This one had been lightly coated with flat black spray paint.  I can't say I blame the previous owner for this, its a quick way to tidy things up.  Still the door had its share of scratches and dings, and you could see where over the years, many people tried and possibly succeeded in prying open the doors with a screwdriver.  The coin return buttons were wrong, they were from an Atari cabinet, and the 25 cent paper inserts had been soaked in soda at some point.  Leaving it like this just wouldn't be setting a good example for the young folks.


I started by removing the coin door and taking it completely apart.  The coin box was also pretty dirty and had some rust spots on the inside.  I saved the old coin door label and after cleaning up the coin box, glued it back into position under the test and service switches.  I soaked the yellowed plastic coin bucket in bleach water over night, and this brightened it up considerably.

For the individual coin doors, I used a small tack hammer to level out the bent edges and any dents on the front, then painted them with one coat of Rustoleum Hammered finish and then a coat of simi-gloss black.  Obviously the best course of action would be to have this sand blasted and powder coated, and I sometimes do that, but this time I decided to take the quick and dirty route.

I soaked the coin return and coin slot parts in soapy water over night and did my best to remove the remaining spray paint, then treated the plastic with Marine 303 vinyl protectant.  Digging through my stash of arcade parts, I found a new set of red coin return buttons that worked perfectly for this version.  I soaked the springs and other lightly rusted screws in vinegar for a few hours, and this removed the rust.

For the various parts of the coin return brackets, I decided just to clean them up, and reassemble.  I learned by asking the folks on KLOV, that this yellowish/gold finish is zink with yellow chromate.  Things of this era were plated with zinc and chromate, but several years previous to this, from what I learned, they were using cadmium which is relatively dangerous to handle.  You certainly wouldn't want to start sanding it or handling the parts without safety equipment.

Whenever I start cleaning up a cabinet for the first time, I save any unidentified parts I find laying in the bottom of the cabinet.  This turned out to be good practice, as the coin door was missing some parts, and I was able to locate them in the random bits I had previously saved.


None of the cam locks came with this cabinet, and the back door, as usually happens, was being held shut with drywall screws.  So for the coin door, I ordered a 4 pack of 7/8" cam locks with matching keys from Amazon.  On the inside of the top door, the original extra key hook was still in place, so I added a set of keys there for originality.


Using some Bondo spot putty, I patched and sanded up the holes and any deep scratches on the back door, then repainted with a water based black satin paint, using a foam roller.

Over the course of a few evenings, I rewired the inside of the cabinet. After running the wire harness through the dishwasher it was sparkly clean.  Using the pictures I took months ago, I was able to route the cables to their original locations, and used identical tiny white zip-ties to reattach everything.

With everything else done, I couldn't avoid the control panel any longer.  I knew this part was going to be tedious, and I had been dreading it.  It actually looks good in this picture, but the plexiglass panel in the instructions area is cracked and damaged, and there are various holes from the previously attached clear plastic cover.

I began by placing the panel in the sun to heat up, and then did my best to peel off the old overlay.  To my surprise, most of it came up relatively easy.  It was the colored bits that posed the most problem.  I used a narrow paint scraper and removed what I could.


This left me with a control panel and a thick coating of adhesive.  After trying various things, I settled on placing the whole panel in a plastic bin, and coating it with a product called CitriStrip.  After soaking in CitriStrip overnight, the adhesive was easy enough to scrape off.  I then had to scrub the panel down with Dawn dish washing detergent.  I cleaned up a few rust spots with sand paper and prepped it for applying the overlay.


Lastly, I approached the matter of replacing the plexiglass control panel windows.  These allow light to shine through, and illuminate the instructions and the Sega logo on the front.  It's a nice touch, but the thin plexi panels didn't fair so well over the years.  The largest one was cracked and badly damaged.  I set about trying to 3d print a replacement for it.


I modeled it up in Fusion 360 then printed it in a clear PETG filament.  Obviously it wasn't going to be clear, but I think it will work well enough.  After three attempts, adjusting the thickness and dimensions, I managed to get a perfectly fitting piece to replace the damaged panel.


So that's all for now.  I'll save applying the control panel overlay for a day when I'm totally rested and ready to take it on.


Monday, July 22, 2019

Alien Syndrome Side Art

So fortunately I was able to track down some reproduction artwork.  Through a guy, who knew a guy, I had ordered new side art, a new control panel overlay, and a custom bezel.

The side art went on perfectly and without air bubbles or any other grief.  This can go badly if not done correctly.  I used the "wet" method by soaking the surfaces down with a spray bottle of water with just a tiny bit of mild soap.  This allows for a small amount of adjustment and with a squeegee I was able to work out any air bubbles with ease.  The artwork looks fantastic and you can see the colors really make this cabinet stand out.


After this I made a trip to Lowes, and purchased a new front glass and new 18" fluorescent tubes for the marquee.  

A quick check in the Alien Syndrome manual shows the original glass as 23 9/16" by 23 9/16".  They have thin window glass at the local Lowes, and they will cut it for free, which is a plus.

For the bezel, I didn't want to apply it to the glass.   I opted instead to purchase a 24" wide sheet of picture matting in white.  I then applied the artwork to the matting and using a new blade in an Exacto knife, I managed to cut the center square and sides out ( and my finger), leaving just the artwork, now on a nice card stock.  The bezel, while not original to the dedicated cabinet, really makes the game look sharp.


After this I cleaned up the metal box where the power cable attaches to the cabinet, by sanding it down and cleaning up any rust.  I then painted it with a gold metalic spray paint similar to it's original finish.  I replaced the power cable and rewired the 120V power lines going to the front control panel light, and the dual fluorescent light fixture in the top of the cabinet.  I checked the fuses and found that one was blown and neither matched the recommendations in the service manual.  Looking through my stash of 250v fuses, I found a 4 amp fuse for the lights, and a 5 amp delayed fuse for the main power input.

After replacing the power switch and replacing some of the old power cables, I decided to mount the marquee and test out the lights.


It's going to be a real beauty!


Monday, July 15, 2019

Game Gear Bender

So after modding my old Game Gear, I started thinking about smd ceramic capacitors.

Everyone talks about the bad capacitors Sega used in the Game Gear, which just seems odd to me.  Seeing how it goes without saying, old equipment, will likely have leaky or dried out capacitors.  This got me thinking about using ceramic capacitors, both for their longevity, and reduced size.

After studying the offerings at Digi-Key for what seemed like hours, I pieced together what I hoped would be suitable replacements for the electrolytic values.  Wherever possible, I kept to the larger smd sizes of 1210, 1206, and I think some were 0805.  These would still be large enough to span the solder pads on the board, and although very tiny by most standards, easy enough to solder with my limited equipment.

Since there's a significant price break for ordering 10 or more pieces, I decided to just get enough to do 10 boards total.  I got on ebay and ordered a few "for parts only" or "broken" Game Gears.  They arrived about the same time the capacitors did, and I got to work cleaning off the old smelly caps, and getting the board nice and clean.  The new caps soldered in place with ease, I mean much, much easier than the previous through hole caps, which saved a lot of time and frustration.  I was enjoying the process so much I ordered a couple more, and before I knew it I had around 6 or 7 working systems.  For kicks I even purchased a few of the rarer colors.  Shipped from Japan as non-working, "Junk" was the word they used in the description.


In the above pic, you can see there are just three connectors between the top and bottom half once the screws are removed from the outside case.  To the top left is a small power board which takes the 9V from the batteries and feeds out 5v, and 34v to the main board.  The power board has just three through hole caps.  Sometimes the AC adapter jack is bad or shorted, which keeps the system from powering on.  

To the top right is the sound board, these have surface mount electrolytic caps, I chose to replace them with similar Nichicon surface mount electrolytic caps.  I suspect they are a better choice for audio circuits.  On one board, I still couldn't get sound after replacing the caps, and it turned out to be a bad earphone jack.


 To the top left of the main board is a 20k thumbwheel potentiometer used to adjust the screen brightness.  As of now, I haven't been able to source these from anywhere online, perhaps a surplus store somewhere has them?  I accidentally melted one of these by getting too close with the soldering iron.


The CPU, for those interested, was a custom Z80A, running at the screaming fast speed of 3.58MHz!

 In the very center of the board is the screen backlight, which seemed to be the achilles heel of the system.  I suppose at the time these were made, white LEDs either hadn't been invented, or were too expensive.  So they used a tiny fluorescent tube, along with the tiny little transformer, and the system chewed through 6 AA batteries in just a few hours of game play. 

My small hoard of refurbished systems

Check out the Game Gear TechWiki at Console 5 for easy to read diagrams and component lists.

They also have a nice downloadable Game Gear Service Manual, which could come in handy.

My parts list from Digikey ( use at your own risk, this is only experimental ) :

ManufacturerDigi-Key Part NumberVA1 Twin ASICVA1 Single ASICUnit PriceDescription
TDK Corporation445-13044-1-NDC1C10.759CAP CER 33UF 6.3V X7S 1210
TDK Corporation445-8036-1-NDC49C430.564CAP CER 22UF 6.3V X7S 1206
TDK Corporation445-11744-1-NDC35C450.584CAP CER 4.7UF 35V JB 1206
TDK Corporation445-14671-1-NDC37C470.807CAP CER 68UF 6.3V X5R 1206
TDK Corporation445-6017-1-NDC39C491.139CAP CER 100UF 4V X6S 1210
TDK Corporation445-14852-1-NDC44,C45C54,C550.345CAP CER 0.47UF 50V X8R 1206
TDK Corporation445-1437-1-NDC31C680.763CAP CER 100UF 6.3V X5R 1210
TDK Corporation445-7644-1-NDC3,C6,C48C4,C11,C14,C420.159CAP CER 10UF 16V X5R 0805
Nichicon493-2088-1-NDC1,C2,C3 Sound0.217CAP ALUM 100UF 20% 6.3V SMD
Nichicon493-9593-1-NDC5,C7 Sound0.214CAP ALUM 47UF 20% 4V SMD
Nichicon493-10444-1-NDC5 Power0.219CAP ALUM 22UF 20% 35V RADIAL
Nichicon493-17696-1-NDC11 Power0.299CAP ALUM 100UF 20% 25V RADIAL
Nichicon493-11812-1-NDC13 Power0.402CAP ALUM 820UF 20% 6.3V RADIAL

While most of the cheap consoles I purchased only needed the capacitors replaced, and a little cleaning, a few were in awful condition, some perhaps beyond saving.  One had screen damage, so I may just order up another McWill LCD kit for it, and hope for the best.

One curious thing of note, during the few years these were being produced, mostly between 1991 and 1994, there were many versions, and revisions.  Also they were manufactured in Taiwan, China, and Japan, with all of them having their own quirks.  I made every effort to jot down notes on each one, and managed to keep the sound boards and power boards together with their original main board.


The humble Sega Game Gear, just gets no love these days.