Tuesday, March 27, 2018

Battlezone

I've been getting back into the 80's Video Game hobby lately.  So it didn't take long for me to locate a project.  


A member of the villageBBS posted an Atari Battlezone as a non-working project, so I jumped at the chance to get it.  The game was located in Ocala which is a few hours away from me.  So since I had planned to drive up to visit my daughter in Jacksonville on Saturday, I made for the Battlezone early in the morning, then after pickup, continued on my trip north.  

The cabinet was much like any other basket case project I've had over the years.  It needed a new power cord, the back door was missing, the insides were caked with 30+ years of dust, and it showed very little sign of ever working again.  On top of this, the two controllers were in disrepair, and needed to be cleaned and rebuilt.


I started off as usual just looking everything over.  There were a number of things I needed to correct right away.  I always start by replacing the power cord and on these Atari cabinets, I check out the power brick and make sure it's even the correct model for this game.  I ordered a replacement "Big Blue" capacitor for the power brick and a cap kit for the AR2 voltage regulator.  The operator had spliced into the power cord and added a light switch to the inside of the cabinet.  I guess this would've been convenient at one time, so he could reach through the coin door and power off the machine.  I removed that and crimped a new power cord down using the original three pin plug.  I then replaced the capacitor, checked the fuses and tested the power brick voltages.


I then turned my attention to the AR2.  The first thing I noticed was a little silver serial number sticker on the AR2.  That got me thinking I hadn't seen one of those labels on earlier Atari vector games.  In the past, I remember seeing them on my Space Duel and Gravitar.  When I started investigating further, I realized I had the wrong version of AR2.  This was a version 4 which I believe would've originally been from a Gravitar or Space Duel, but not Battlezone.  Battlezone requires a version 2 AR2.  Fortunately the AR2 boards are very similar and mine only needed a half dozen parts soldered in place in order to make it work like an AR2 version 2.  There were a couple of large wire wound resistors that I needed to order so I got to work doing other things while waiting for the parts to arrive.


The cabinet was dusty and filthy so I got busy cleaning up what I could.  I removed the monitor and saw that the colored overlays were stuck to the surface of the screen.  The half silvered mirror was so dirty that I couldn't see through it.  Once it was removed, I could then see the fluorescent cardboard insert was intact and in good shape.  I used a soft brush and the vacuum cleaner to lift the dust off of the cardboard artwork.  I cleaned the glass and wiped down the monitor.  Battlezone used a black and white vector monitor, I believe mine is an Electrohome G05.  They added a green and red color overlay to the screen to produce colors and those were reflected up onto the mirror which gave the effect of presenting the view upon the cardboard backdrop.  The backdrop has some fluorescent paints, which are then lit up by a white black light mounted inside the front of the cabinet.  Its a pretty awesome effect.  


I did a little searching online and found that Bill at Biltronix had already sourced the needed replacements for the color overlay.  He also pointed out that many of the Battlezones have the monitor mounted incorrectly, usually after having been removed for repairs.  After looking closely I realized my monitor was indeed mounted incorrectly and that led to the original overlays being stuck to the screen rather than being supported above it.  I ordered replacements, and decided I'd have to sort that out once the machine was working again.

Battlezone is unique in that it may be the first or one of the first virtual reality games.  The front of the cabinet has a plastic shroud with a small window.  You have to press your face against the periscope style bezel in order to see the display, and it's a nice immersive perspective.  I removed the plastic bezel and cleaned it inside an out, each window had to be carefully removed and cleaned.  During this time I also notice that one of the two speakers at the top of the cabinet were missing.  The manual says its a 5 inch, 8 ohm speaker.  I found a pair of replacements at parts-express.com.  I decided to order the shielded speakers, as in the past I've encountered problems between the magnets in the speakers and the crt display.  At this point I also replaced the black light and the fluorescent marquee light, and both starters.  


From research I had done online, I knew that the internal parts of the controllers would need replaced.  Fortunately there are aftermarket reproductions of the centering bellows.  These you can order from Wizzesworkshop.  I had actually been dreading what I would find when the time came to disassembling the controllers.  Sure enough the old bellows were tore and needed replaced, but the rest of the bits were in pretty good shape.  During the life of the game, someone had replaced the fire button, but since it's pretty much the same as the start buttons from other Atari games from that era, I happened to have one on hand.  One item that was missing was the silver centering ring for the button.  Also one of the controller handles was busted and had been held back together with long bolts that passed through both sides.  I found a site that provides NOS parts (ArcadeFixIt.com) so I ordered the missing ring and both replacements for the broken halves of the right side controller.  I dropped the plastic parts in a tub of Mr. Clean to soak for a few days.  
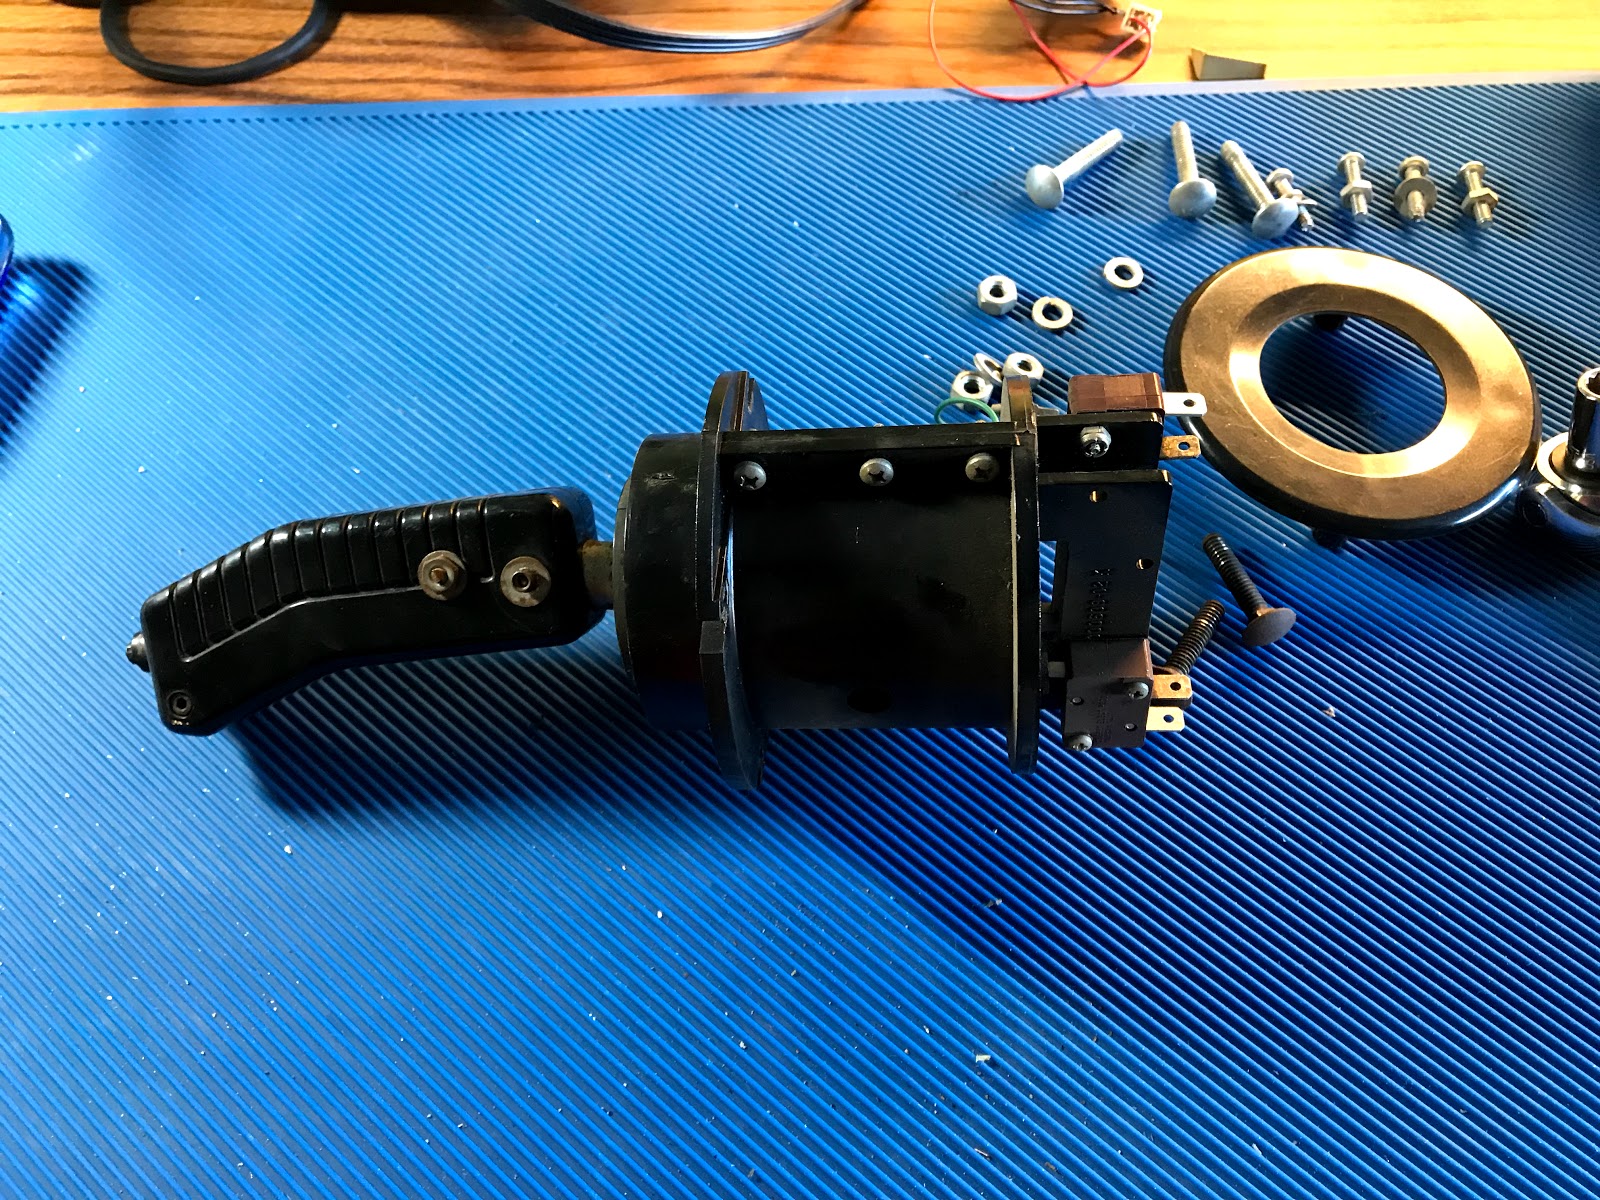


When the parts arrived I got busy re-assembling the controllers with the new centering bezels.  I also re-wired the fire button and fished the wires down through the handle.  With the new button and centering ring the controller was looking great again.  The two handle pieces were in excellent shape and I used the old allan head screws to hold it all together.  


I removed the coin door and soaked the coin slots and return bezels in soapy water.  These had been masked over with duct tape at some point and that needed removed.  I also took this time to respray the worn surface of the coin doors with satin black Rustoleum.  For the lower speaker grill, I masked off the surrounding cabinet and gave it a very light spray of the same satin black.

For the front step of this game, someone had done a nice job of installing green indoor outdoor carpet.  This actually didn't look terrible, but I wanted something closer to original.  I found some thin runner carpeting at Lowe's which they say by the foot.  I purchased about 3 feet and it was more than enough to cover the step.  It didn't look perfect but I think it is a nice improvement.

I cut a new backdoor and added a small vent similar to other Atari vector cabinets I've owned.  I then added a new lock to the new back door and another with matching keys to the front coin door.


At this point as a final cosmetic touch, I decided to install new t-molding.  I had found about 40 feet of it in the attic, which I must've ordered for a previous project and never gotten around to using it.  So I replaced the t-molding, and with that I stood back and decided the cabinet was finally looking pretty good, or well enough.


Thursday, April 20, 2017

Last year, I believe it was May 4th, it was announced that Star Wars Celebration 2017 was going to be held in Orlando.  Awesome I thought, maybe I'll have my droid finished and I can take it along or whatever it is people do with these things.

Then in late June, an "Official call for droids" came out on Astromech.net.  To which I was like " wait, my droid is still not finished" how can I apply?  The call for droids is basically the group's way of organizing who will get to display their pride and joy in a themed room especially for us droid builders.  So I applied and furnished the pictures I had, but sadly was turned down, naturally my droid wasn't complete.


As the show drew closer I discovered from reading on the Astromech forum that they didn't turn away finished droids, and that I would, at the very least, be able to park my droid in the builders storage room during the evenings.  So somewhere around the late fall of 2016 I decided I'd need to complete my astromech and get it to the show regardless.

At the time I had probably 30% of the build remaining.  I had started work on this project back in the fall of 2013, holy smokes it had been nearly 3 years.   I had the foot shells to finish and mount on the drive system.  I had the battery boxes to complete and the foot hoses to mount.  Then the dome still needed the radar eye installed.  Lastly the entire body needed to have all of the parts 3d printed and installed, and the skins mounted and painted.  It was a huge amount of work to wrap up in just a few months, and with the holidays thrown in for good measure.


So I started by writing everything down in notepad on my phone.  I called it something like "Hella important tasks to finish" .  I tried to make it as detailed as possible, and as I went along I checked each part finished.  This turned out to be a life saver.  So I worked as efficiently as I could, working on weekends and after work as often as my schedule would permit.  My build log on Astromech.net was kept up as well as I could, but mainly I focused on getting the work done, and catching up the blog was secondary.  As you can see, I didn't add anything to this blog during that time.

Anyway it all worked out.  I finished up the droid, I named R2-J8, just a few days before the start of SWCO 2017.  Those extra few days allowed me the time to add weathering to the droid, which I think turned out better than expected.


R2-J8


Star Wars Celebration 2017 was a blast.  I can post more about it later, but I have to say that all the hard work of making the droid was rewarded by all the compliments, not only from fans but other droid builders as well.  Naturally some of the best builders in the world were there, I was both humbled by their amazing talent and at the same time, experienced a sense of pride at having my work displayed along with theirs.  The fans were amazing.  Best of all were the littlest fans.  To them, R2-J8 was real, and completely magic.

R2-J8 receiving secret plans


R2-J8 falls into the hands of the empire

R2-J8  sold on the Jawa Market

R2-J8 on display in R2 builders room


Wednesday, December 7, 2016

Don't you just love 8-bit art?

Okay, so if you own a 3d printer, you're probably thinking:

How can I make something useful?

I'm guessing there are a lot of things that can be done, provided you have the imagination.

If you're like me, and lack that quality, head on over to Thingiverse.com

Check out Thingiverse for the stl files.
http://www.thingiverse.com/thing:1174471

We often set up a second or third small tree in order to display our more quirky or eclectic ornaments.  Otherwise I would'nt have gotten away with this one.  =)

You could print this out with yellow filament or just do as I did, and paint it using whatever you have on hand.  I used the basic acrylic craft paint you can find almost anywhere.

If you're feeling like a small electronics project, there is also a fancy version thanks to the folks at Adafruit:  it's called Starduino:
https://learn.adafruit.com/starduino-neopixel-8-bit-mario-star-tree-topper


Saturday, April 9, 2016

Getting it all back together

As I was saying, I wanted the monitor back in the cabinet.  So today I started reassembling.

These cabinets have bolts that mount through the side of the cabinet, so I polished those up by clamping them in a cordless drill and holding them up to some fine sandpaper.  I then cut the openings in the newly applied side art and bolted everything up.

The lower marquee bracket and lower bezel bracket were both starting to rust away in spots.  I sanded those down and hit them with some Rustoleum high fill primer and then lightly sanded them down till they looked and felt smooth.  I guess I may have done this twice, and sanded the primer down each time.  Then I hit them with a few light coats of satin black.

I picked up a small led under counter light fixture from the hardware store and mounted that in place of the old florescent light fixture.  It was the perfect size and will run cooler and trouble free for as long as I'll care.


The bezel was pretty dirty and had some major stuck on gunk at the bottom where the lower bracket was attached.  This I cleaned up with some simple green.  I then hit the whole bezel front and back with a dual action car buffer and some Mcquires ultimate polish.  It seemed to clean it up quite nicely.

When I started this project over a year ago, I must have ordered most of the parts I thought I would need.  So in a box I found the new instruction card and new bolts for the control panel.  Which was really thoughtful of me, thanks john2015.


I also found the flat white t-molding in the bottom of the cab, guess I ordered that too.  So I put that on, knowing it would look like I had done a lot of work when really it's a super easy step.


I then mounted the main board inside the cabinet and hooked up the harness.  I had to add a new power cord and this I did by extracting the pins from the old two prong plug and re-crimping some new pins on the end of the new power cord.  I then crimped a ring terminal on the ground wire and got everything into place.

I crossed my fingers and turned the game on.  I could hear the same old Nintendo "boink" sound.  Then I walked around the front to see if the game was up, and sadly it wasn't to be.  I checked a few voltages, and they were down to around 4.8v.

This got me looking at the power supply.  I wish I had taken some pictures of it, but it was just a fidgety thing, lots of screws and tiny bolts holding it together.  When I did get it apart it was a mess of twisted grimy smokey smelling wires.  I replaced all the old capacitors with ones that I happened to have on hand.  Some I didn't have but I guess I can always get back in there and finish some day.


Anyway, long story short, I fired it back up, and the voltages were now just above 5.1v, so I was happy with that.  The bad news is the game was still not working, it appears to be stuck in some kind of constant watchdog reset.  Okay, maybe it doesn't work, but it's starting to look nice, right?

The PCBs are going to get shipped out to Mike's Arcade for repairs.

Wednesday, April 6, 2016

Side Art for DK

It's about time I get back to work on this Donkey Kong project.

If you've been reading along, you know that I recapped the monitor.  Well since then it's been sitting around the garage, and doing it's best to be a burden.  If I can get the artwork installed, then I can return the monitor to the cabinet, and that will be one less thing I have to move around.

So, I ordered the DK sideart from arcadeshop, and it arrived yesterday.  Rather than wait around for neatly rolled and somewhat expensive giant stickers to get stepped on, I decided I'd try to get them affixed to the cabinet as soon as possible.


After googling I found the consensus was that it should be 4 and 3/8 inches from the top and exactly 2 1/2 inches from the back.  There were lots of other suggestions on how to apply the artwork.  Such as using painters tape to align the piece and special rollers and such.  Well I didn't have anything but scotch tape, and my laminate roller seemed a bit awkward so I just used a squeegee thing that I had from another project.  I think perhaps the most important item to have on hand is some upbeat 80's music, I used New Clear Days, by The Vapors, vinyl is best if you can find it.


I taped it in place about midway down and peeled the backing off ( of the side art, not the old record album).  I then folded the sticky portion down and using a pair of scissors, removed the backing and carefully affixed the top of the artwork, using a squeegee and some car detailing spray as a lubricant on the top surface.  Working this carefully up from the middle, I had little to no bubbles trapped between the art and the cabinet.


The next step was to remove the remaining tape, carefully, since I had to use scotch tape.  Then I flipped the whole piece upwards and carefully peeled a portion of the backing off and downward.


Placing the backing in this way helps to hold the artwork away from the cabinet so that you can then carefully squeegee the material to the surface a quarter of an inch at a time.  Once again, I had very few bubbles.  I think it turned out well.  The second side was even easier.


Thursday, June 11, 2015

Speed Controllers

So recently I've made a push to complete more on this Astromech droid.  My short term goal is to have most of the functions working by the release date of the new movies.  That's this December if you've been living under a rock.

Some clever folks on the forum worked out how to use the tiny and inexpensive PS3 navigation controllers to drive their droid and control it's sounds, head turns and movement.

Once I saw this I knew right away it was the route I wanted to go.  Who wants to carry around a large radio to control a robot that needs to look autonomous?  The Sony PS3 nav controller is almost hidden when held in the hand and can interface with the devices I have already decided to use in my build.  One member has already designed a method for interfacing this controller with the Marcduino control boards I am implementing for the lights, panels, and sound controls.  So it was a big relief to see these options all coming together.

Over the last month I've ordered in and installed most of my electronics.  The dome drive motor, I ordered up as a kit, and so that was a breeze to get working.  I polished up the Rockler bearing, and reassembled it, with much success.  The head turns nicely now, and relatively quietly.


I then mounted two shelves in the top portion of the body in order to provide space for the components I was going to need to get the droid rolling and moving about.


The components trickled in and I had everything ready for install on a Saturday afternoon, I think it was June 4th.  I spent the day with little to no interruption, just deciding where each piece should go, and carefully getting it all wired properly.  Later that evening, I was able to test the system.  I'm now quite happy to say the droid is driveable, and his head can be controlled or allowed to run autonomously.  It was an awesome feeling to have, what up until now, seemed like a pile of parts, be mobile.


 I built and mounted this little control panel in order to mount the main switch and two foot drive switches.  I plan to add whatever switches become necessary to the panel, if I need more room, perhaps I'll have to make a larger panel or re-think what I'm going to do.  For now it works and I'm reasonably happy with the look.


In my excitement, I sent this to James:


He followed up with this hysterical parody:  I LOVE IT!  He even does the bit where I hold the controller up! =)