Monday, April 29, 2019

Alien Syndrome Has Arrived

Alien Syndrome Restoration


 I'd been wanting this game for quite a few years.  It's a fun game to play, and an interesting game to have in a collection.  When these are fully restored, I feel they are right up there with Tron as far as quirky artful presentation goes. Put simply, it's just a very cool game, with a great cabinet design.

A few weeks ago, one of these came up for sale, just over in Tampa, and I contacted the seller as soon as I saw it.  The listing had been up for two days, so naturally it was already spoken for, bummer.

I logged into the local collectors forum "theVillageBBS" and posted, asking who had snatched this game from my grasp.  Turns out it was the guy I had purchased a Battlezone from just last year.  As luck would have it, another collector, had one and since he was more of a pinball kinda collector, he offered to sell his.  Only catch, the game was in Jacksonville.

So I arranged to drive up, planned to meet with my daughter Kylie for dinner, since she's a student at UNF, and head back, all on a Wedneday afternoon.  This went as planned, and by Midnight that evening, having braved the perils of Interstate 4, I had the cabinet sitting in my shop.

So while the game is complete, and working, and the parts are primarily original, there was very little that wouldn't need some attention. 

Cosmetically it just looks better in pictures than in person.  It's just rough on all the edges. 


Starting with the control panel, there are little plexiglass windows, which when lighted from behind, serve to illuminate the instruction panel and the Sega logo.  The top plexi window had been pushed in and broken.  Then someone screwed a clear plexi onto the entire top surface of the panel to protect from further damage.

The front and sides of the cabinet have the usual scars from decades of being moved from place to place and generally being in public places.  While the side art is largely intact, it is torn off in places and there are several deep gouges. From the looks of it, there were either ashtrays or drink holders attached to the sides at some time.  There were also lock bars added, and the power switch had been unscrewed and mounted inside. 

The inside of the cabinet looks to be original.  The original power supply was in place and still working after 32 years.  Upon powering up the game, I could hear the power supply making a loud hiss.  I'm assuming the sound was coming from two large leaking filter capacitors, just visible through the dust.


Lastly the game circuit board, a Sega System 16 B Type, was still working, with it's original battery backed FD1089 suicide chip.  There are fixes for this, which involve replacing the FD1089 with a standard Motorolla 68K processor, and swapping out some of the ROM chips with non-encrypted versions of code.  If the battery dies on the current processor, it takes the encryption key with it, rendering the game dead.  This will need addressed, since after all these years, that little coin cell battery could go at any moment.


Wednesday, April 17, 2019

R2-J8 at Yuri's Night Space Coast


This year R2-J8 was invited to attend Yuri's Night at the Kennedy Space Center.  How could I pass up the chance to get some photos with the Space Shuttle Atlantis?!

To be honest, J8 wasn't the only droid invited.  My local R2 builders club "Southern R2 Builders" was there, along with some very talented Wall-E builders.

Our event organizers suggested we arrive early to get set up, as the party was set to begin at 8:00 PM.
For this event, I was determined to show up early and get some good pics, as it turned out, so did everyone else in our group.  We had nearly an hour to drive around the Atlantis Visitor Complex and take photos, and while the lighting wasn't exactly ideal, we managed to make the most of it.


Driving on the glass smooth floor was a droid wranglers dream.  Once I even took J8 to the 3rd floor just to see how well he handled the incline.  Out of fear of back charging the control circuitry rolling down to ground floor, I decided it best to take the elevator back.

Basically the entire place was transformed into a space age night club, with shuttle Atlantis suspended overhead, unbelievable!  Guests were actually better behaved than some of the Disney events I've attended.  There was a groovy DJ, a first rate laser light show, and special effects a plenty.


For most of the evening I drove J8 around, and through the crowd, often out onto the dance floor.  Once he even scooted into the VIP section, just under the nose of the bouncer.  My biggest concern when taking the droid out to an event is keeping him from running into people or hitting things, and I wasn't entirely sure a full on party would be possible.  Needless to say, all went well.

For me, it's always great to see a person completely startled at the site of an astromech droid, and this night had plenty of those moments.


  There were some awesome Star Wars, and Star Trek costumes, as well as other various space themed outfits.  One of the best outfits of the night was a 60's style engineer, with pocket protector, short sleeve button up shirt, and skinny neck tie, so classic Apollo era.

Anyway, even though I got home very late, and I mean 3AM late, I have to say I had a nice time, and I'd do it again.

If you're looking for a unique and nerdy night out, check out Yuri's Night, it's an international party, held on April 12th each year to celebrate space exploration.


Tuesday, March 27, 2018

Battlezone

I've been getting back into the 80's Video Game hobby lately.  So it didn't take long for me to locate a project.  


A member of the villageBBS posted an Atari Battlezone as a non-working project, so I jumped at the chance to get it.  The game was located in Ocala which is a few hours away from me.  So since I had planned to drive up to visit my daughter in Jacksonville on Saturday, I made for the Battlezone early in the morning, then after pickup, continued on my trip north.  

The cabinet was much like any other basket case project I've had over the years.  It needed a new power cord, the back door was missing, the insides were caked with 30+ years of dust, and it showed very little sign of ever working again.  On top of this, the two controllers were in disrepair, and needed to be cleaned and rebuilt.


I started off as usual just looking everything over.  There were a number of things I needed to correct right away.  I always start by replacing the power cord and on these Atari cabinets, I check out the power brick and make sure it's even the correct model for this game.  I ordered a replacement "Big Blue" capacitor for the power brick and a cap kit for the AR2 voltage regulator.  The operator had spliced into the power cord and added a light switch to the inside of the cabinet.  I guess this would've been convenient at one time, so he could reach through the coin door and power off the machine.  I removed that and crimped a new power cord down using the original three pin plug.  I then replaced the capacitor, checked the fuses and tested the power brick voltages.


I then turned my attention to the AR2.  The first thing I noticed was a little silver serial number sticker on the AR2.  That got me thinking I hadn't seen one of those labels on earlier Atari vector games.  In the past, I remember seeing them on my Space Duel and Gravitar.  When I started investigating further, I realized I had the wrong version of AR2.  This was a version 4 which I believe would've originally been from a Gravitar or Space Duel, but not Battlezone.  Battlezone requires a version 2 AR2.  Fortunately the AR2 boards are very similar and mine only needed a half dozen parts soldered in place in order to make it work like an AR2 version 2.  There were a couple of large wire wound resistors that I needed to order so I got to work doing other things while waiting for the parts to arrive.


The cabinet was dusty and filthy so I got busy cleaning up what I could.  I removed the monitor and saw that the colored overlays were stuck to the surface of the screen.  The half silvered mirror was so dirty that I couldn't see through it.  Once it was removed, I could then see the fluorescent cardboard insert was intact and in good shape.  I used a soft brush and the vacuum cleaner to lift the dust off of the cardboard artwork.  I cleaned the glass and wiped down the monitor.  Battlezone used a black and white vector monitor, I believe mine is an Electrohome G05.  They added a green and red color overlay to the screen to produce colors and those were reflected up onto the mirror which gave the effect of presenting the view upon the cardboard backdrop.  The backdrop has some fluorescent paints, which are then lit up by a white black light mounted inside the front of the cabinet.  Its a pretty awesome effect.  


I did a little searching online and found that Bill at Biltronix had already sourced the needed replacements for the color overlay.  He also pointed out that many of the Battlezones have the monitor mounted incorrectly, usually after having been removed for repairs.  After looking closely I realized my monitor was indeed mounted incorrectly and that led to the original overlays being stuck to the screen rather than being supported above it.  I ordered replacements, and decided I'd have to sort that out once the machine was working again.

Battlezone is unique in that it may be the first or one of the first virtual reality games.  The front of the cabinet has a plastic shroud with a small window.  You have to press your face against the periscope style bezel in order to see the display, and it's a nice immersive perspective.  I removed the plastic bezel and cleaned it inside an out, each window had to be carefully removed and cleaned.  During this time I also notice that one of the two speakers at the top of the cabinet were missing.  The manual says its a 5 inch, 8 ohm speaker.  I found a pair of replacements at parts-express.com.  I decided to order the shielded speakers, as in the past I've encountered problems between the magnets in the speakers and the crt display.  At this point I also replaced the black light and the fluorescent marquee light, and both starters.  


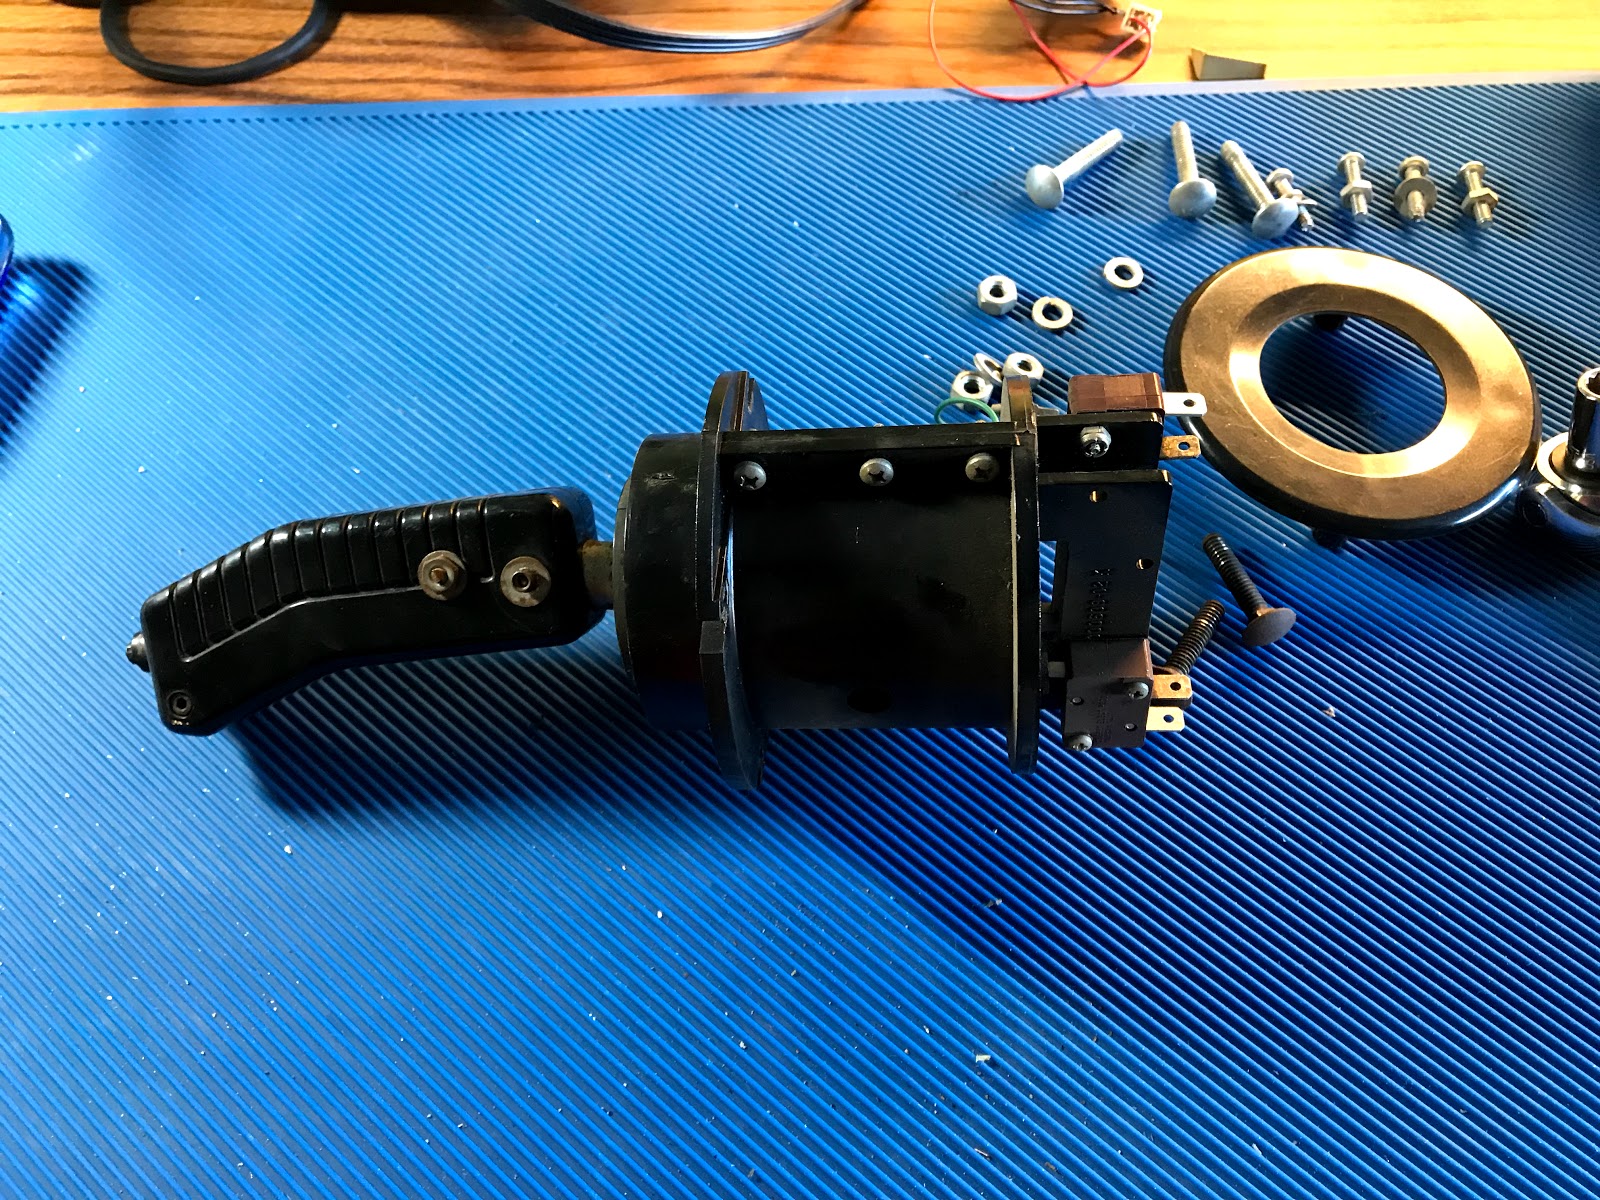
From research I had done online, I knew that the internal parts of the controllers would need replaced.  Fortunately there are aftermarket reproductions of the centering bellows.  These you can order from Wizzesworkshop.  I had actually been dreading what I would find when the time came to disassembling the controllers.  Sure enough the old bellows were tore and needed replaced, but the rest of the bits were in pretty good shape.  During the life of the game, someone had replaced the fire button, but since it's pretty much the same as the start buttons from other Atari games from that era, I happened to have one on hand.  One item that was missing was the silver centering ring for the button.  Also one of the controller handles was busted and had been held back together with long bolts that passed through both sides.  I found a site that provides NOS parts (ArcadeFixIt.com) so I ordered the missing ring and both replacements for the broken halves of the right side controller.  I dropped the plastic parts in a tub of Mr. Clean to soak for a few days.  


When the parts arrived I got busy re-assembling the controllers with the new centering bezels.  I also re-wired the fire button and fished the wires down through the handle.  With the new button and centering ring the controller was looking great again.  The two handle pieces were in excellent shape and I used the old allan head screws to hold it all together.  


I removed the coin door and soaked the coin slots and return bezels in soapy water.  These had been masked over with duct tape at some point and that needed removed.  I also took this time to respray the worn surface of the coin doors with satin black Rustoleum.  For the lower speaker grill, I masked off the surrounding cabinet and gave it a very light spray of the same satin black.

For the front step of this game, someone had done a nice job of installing green indoor outdoor carpet.  This actually didn't look terrible, but I wanted something closer to original.  I found some thin runner carpeting at Lowe's which they say by the foot.  I purchased about 3 feet and it was more than enough to cover the step.  It didn't look perfect but I think it is a nice improvement.

I cut a new backdoor and added a small vent similar to other Atari vector cabinets I've owned.  I then added a new lock to the new back door and another with matching keys to the front coin door.


At this point as a final cosmetic touch, I decided to install new t-molding.  I had found about 40 feet of it in the attic, which I must've ordered for a previous project and never gotten around to using it.  So I replaced the t-molding, and with that I stood back and decided the cabinet was finally looking pretty good, or well enough.


Thursday, April 20, 2017

Last year, I believe it was May 4th, it was announced that Star Wars Celebration 2017 was going to be held in Orlando.  Awesome I thought, maybe I'll have my droid finished and I can take it along or whatever it is people do with these things.

Then in late June, an "Official call for droids" came out on Astromech.net.  To which I was like " wait, my droid is still not finished" how can I apply?  The call for droids is basically the group's way of organizing who will get to display their pride and joy in a themed room especially for us droid builders.  So I applied and furnished the pictures I had, but sadly was turned down, naturally my droid wasn't complete.


As the show drew closer I discovered from reading on the Astromech forum that they didn't turn away finished droids, and that I would, at the very least, be able to park my droid in the builders storage room during the evenings.  So somewhere around the late fall of 2016 I decided I'd need to complete my astromech and get it to the show regardless.

At the time I had probably 30% of the build remaining.  I had started work on this project back in the fall of 2013, holy smokes it had been nearly 3 years.   I had the foot shells to finish and mount on the drive system.  I had the battery boxes to complete and the foot hoses to mount.  Then the dome still needed the radar eye installed.  Lastly the entire body needed to have all of the parts 3d printed and installed, and the skins mounted and painted.  It was a huge amount of work to wrap up in just a few months, and with the holidays thrown in for good measure.


So I started by writing everything down in notepad on my phone.  I called it something like "Hella important tasks to finish" .  I tried to make it as detailed as possible, and as I went along I checked each part finished.  This turned out to be a life saver.  So I worked as efficiently as I could, working on weekends and after work as often as my schedule would permit.  My build log on Astromech.net was kept up as well as I could, but mainly I focused on getting the work done, and catching up the blog was secondary.  As you can see, I didn't add anything to this blog during that time.

Anyway it all worked out.  I finished up the droid, I named R2-J8, just a few days before the start of SWCO 2017.  Those extra few days allowed me the time to add weathering to the droid, which I think turned out better than expected.


R2-J8


Star Wars Celebration 2017 was a blast.  I can post more about it later, but I have to say that all the hard work of making the droid was rewarded by all the compliments, not only from fans but other droid builders as well.  Naturally some of the best builders in the world were there, I was both humbled by their amazing talent and at the same time, experienced a sense of pride at having my work displayed along with theirs.  The fans were amazing.  Best of all were the littlest fans.  To them, R2-J8 was real, and completely magic.

R2-J8 receiving secret plans


R2-J8 falls into the hands of the empire

R2-J8  sold on the Jawa Market

R2-J8 on display in R2 builders room


Wednesday, December 7, 2016

Don't you just love 8-bit art?

Okay, so if you own a 3d printer, you're probably thinking:

How can I make something useful?

I'm guessing there are a lot of things that can be done, provided you have the imagination.

If you're like me, and lack that quality, head on over to Thingiverse.com

Check out Thingiverse for the stl files.
http://www.thingiverse.com/thing:1174471

We often set up a second or third small tree in order to display our more quirky or eclectic ornaments.  Otherwise I would'nt have gotten away with this one.  =)

You could print this out with yellow filament or just do as I did, and paint it using whatever you have on hand.  I used the basic acrylic craft paint you can find almost anywhere.

If you're feeling like a small electronics project, there is also a fancy version thanks to the folks at Adafruit:  it's called Starduino:
https://learn.adafruit.com/starduino-neopixel-8-bit-mario-star-tree-topper